
To paint trim with crisp lines, start by preparing the area with painter’s tape along the edges, pressing it down firmly. Use a high-quality, angled brush, applying paint with controlled, steady strokes, and cut in carefully along the tape line. Remove the tape while the paint is slightly tacky at a sharp angle for clean edges. Practicing patience and finesse during application and touch-ups will help you achieve professional-looking results—keep going, and you’ll master the technique.
Key Takeaways
- Use painter’s tape along trim edges and press firmly to prevent paint bleed.
- Choose an angled, high-quality brush for precise, controlled application.
- Cut in carefully along tape line with smooth, deliberate strokes without overloading the brush.
- Remove tape at a sharp 45-degree angle while paint is still slightly tacky for clean lines.
- Touch up any imperfections with a small brush to ensure crisp, professional-looking trim.

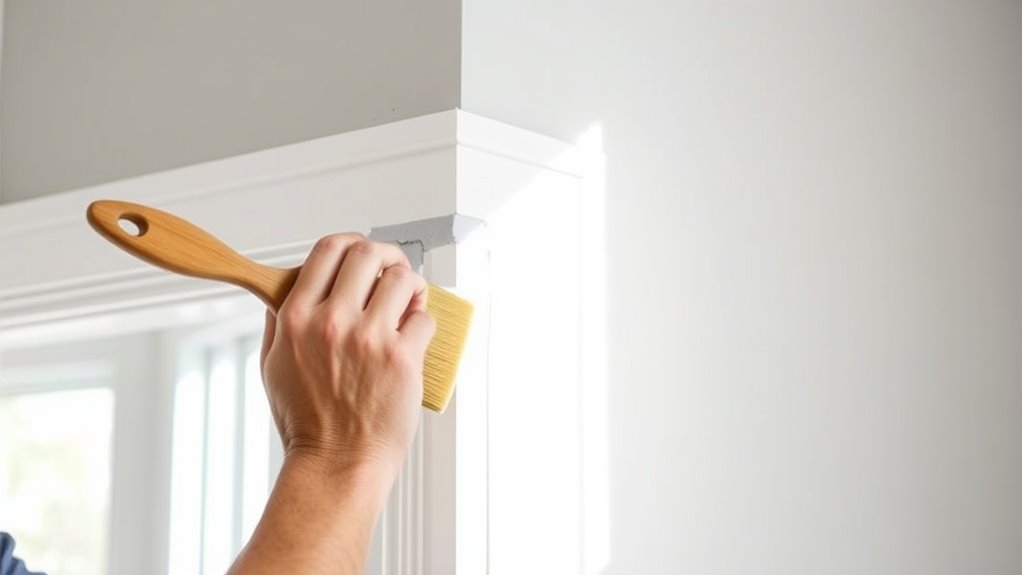
Achieving crisp, clean lines when painting trim can markedly enhance the overall look of a room, and with the right techniques, you can do it yourself with confidence. The key to perfect lines lies in your brush techniques and the careful use of painter’s tape. Start by selecting a high-quality, angled brush designed for trim work. An angled brush allows for better control and precision, helping you follow the edges more easily. Dip your brush into the paint, but avoid overload; wipe off excess to prevent drips and uneven strokes. Use smooth, deliberate strokes, starting from the edge of the trim and pulling outward. This approach minimizes paint buildup and helps create a more uniform line. Keep your brush angled to maintain control, and don’t press too hard—light, controlled strokes produce cleaner results.
Before you begin painting, prepare your space thoroughly. Apply painter’s tape along the edges of the trim, pressing it down firmly to prevent paint bleed. Make sure the tape adheres well, especially at corners and curves, to maintain crisp lines. Once the tape is in place, you can start painting. When you reach the taped edges, use your angled brush to carefully cut in along the tape line. The goal here is to paint just up to the tape, not over it, so that when you remove the tape later, the line remains sharp. Work slowly and steadily, and if you notice any gaps or unevenness, gently feather the paint with your brush to smooth it out.
After completing your first coat, allow it to dry thoroughly before applying additional coats. When the paint is dry, carefully remove the painter’s tape at a sharp, 45-degree angle. Doing so while the paint is still slightly tacky helps prevent peeling or disturbing the fresh paint. If you see any tiny imperfections or bleed-through, use a small brush to touch up those areas, maintaining the crispness of your line. Practice makes perfect, so don’t get discouraged if your first attempt isn’t flawless. With patience and attention to detail, your trim will feature sharp, professional-looking lines that elevate the entire room’s appearance. Remember, the combination of precise brush techniques and proper taping is what makes all the difference in achieving those clean, crisp lines on your trim.
Frequently Asked Questions
What Tools Are Best for Painting Crisp Trim Lines?
You should use painter’s tape, a high-quality angled brush, and a small foam brush for best results. Start with edge prep by carefully taping along the trim, ensuring no paint bleeds. Master brush techniques like steady, light strokes to maintain crisp lines. Keep the brush slightly angled, and work slowly for precision. These tools and techniques help you achieve sharp, professional-looking trim lines effortlessly.
How Do I Prevent Paint Bleed When Lining Edges?
Imagine you’re painting trim and want sharp lines; to prevent paint bleed, start with proper edge preparation. Carefully tape the edges, then apply a thin layer of primer along the line to create a barrier. When you paint, use a high-quality brush or painter’s tape and work slowly along the edge. This approach minimizes paint seepage and guarantees crisp, clean lines every time.
Can I Use Painter’s Tape on Textured Surfaces?
Yes, you can use painter’s tape on textured surfaces, but it requires extra care. To get clean lines, press the tape firmly to conform to the texture, ensuring it sticks well. Use a putty knife or your finger to press down edges and prevent paint bleed. Choose a painter’s tape designed for textured surfaces for better adhesion and easier removal. This way, you’ll achieve crisp, professional-looking trim lines even on textured walls.
How Long Should I Wait Between Coats?
You should wait about 2 to 4 hours between coats, but always follow the paint’s recommended drying time on the label. Confirm the paint has a consistent, smooth texture for even application. Rushing this step can lead to uneven lines or smudges. Check that the previous coat is dry to the touch before applying the next. Patience ensures crisp, professional-looking trim with sharp lines.
What’s the Best Way to Fix Mistakes on Crisp Lines?
To fix mistakes on crisp lines, start with touch-up techniques by gently dabbing with a small, angled brush to correct uneven edges. If needed, carefully use painter’s tape to re-establish the line and then reapply paint for sharpness. Choosing the right brush, like a fine detail or angled brush, helps achieve precise control. Work slowly, and don’t rush—practice makes perfect for flawless, crisp trim lines.
Conclusion
With patience and a steady hand, you’ll find that achieving crisp trim lines elevates your space with subtle elegance. Embrace the process as an opportunity to refine your skills and add a touch of craftsmanship to your home. Remember, even the most refined finishes come from a series of small, deliberate steps. Trust in your efforts, and soon you’ll enjoy the polished look that hints at your attention to detail and dedication.