To repair your mid-century tapered legs and mounts, start by inspecting for damage or looseness. Tighten any loose screws or bolts, and replace worn or broken hardware with matching pieces to maintain authenticity. If a leg is cracked or chipped, consider replacing it entirely, ensuring it matches the original style. Reinforce mounts with wood filler or inserts, and securely attach new hardware for added stability. For more detailed repair steps, continue exploring how to preserve your furniture’s vintage charm.
Key Takeaways
- Inspect legs and mounts for looseness, cracks, chips, or damage to determine the repair approach.
- Replace damaged or cracked tapered legs with matching, authentic mid-century style components.
- Tighten or reinforce mounts using appropriate hardware, wood filler, or new brackets for stability.
- Use suitable tools like screwdrivers, wood glue, and clamps to ensure secure, durable repairs.
- Address structural issues thoroughly to prevent future wobbling or damage and maintain furniture integrity.

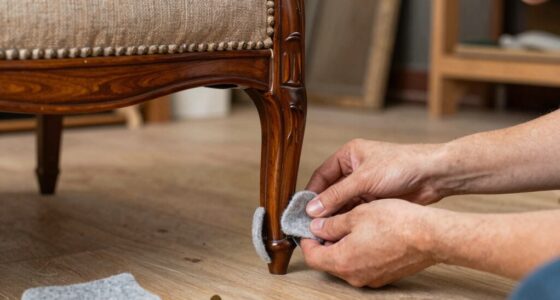
If your mid-century furniture’s tapered legs or mounts are loose or damaged, it’s vital to repair them promptly to restore stability and appearance. Loose legs can make the piece wobbly, risk further damage, or even cause injury. To fix this, start by evaluating whether the problem stems from a loose mount or damaged leg. If the leg itself is cracked or chipped, you may need to contemplate leg replacement. Replacing a damaged leg with a matching tapered leg ensures the piece maintains its authentic mid-century look. When doing leg replacement, remove the old leg carefully, clean the mounting area, and attach the new leg securely using appropriate hardware or glue if necessary. Be sure to match the original taper and style for an authentic finish.
Additionally, understanding the importance of color accuracy can guide you in selecting paint or finishes that match the original aesthetic of your furniture, preserving its vintage appeal.
If the mounts are loose or failing, reinforcement is key. Mount reinforcement involves strengthening the connection points where the legs attach to the furniture. This can be achieved by tightening existing screws or bolts, or by adding new fasteners if the original hardware is worn out. For mounts that have become stripped or damaged, you might need to use wood filler or inserts to secure the fasteners better. In some cases, replacing the mount entirely with a new bracket designed to hold mid-century furniture legs can provide a more durable solution. Reinforcing mounts not only improves stability but also prevents future issues from developing, extending the life of your furniture.
When performing these repairs, always use the proper tools and materials. A screwdriver, wood glue, clamps, and replacement hardware are essential. If you’re replacing a leg, ensure the new one is the correct size and style to keep your furniture true to its mid-century aesthetic. For mount reinforcement, choosing sturdy fasteners and possibly adding wood glue can help create a stronger connection. It’s also wise to check the overall condition of the furniture’s structure; loose or damaged legs could be a symptom of a larger issue, like warping or weakened joints, which might require further repairs.
Frequently Asked Questions
What Are the Best Adhesives for Repairing Tapered Legs?
For repairing tapered legs, you should use a strong adhesive like wood glue for most wood-to-wood joints, as it provides a solid bond and is easy to work with. If the break involves more stress or a gap, epoxy adhesive offers extra strength and fills gaps effectively. Both adhesives work well; just verify you clamp the pieces securely while they dry for the best results.
How Can I Prevent Future Damage to Tapered Mounts?
To prevent future damage to tapered mounts, you should perform regular preventative maintenance, like checking for looseness or cracks. Keep the mounts clean and avoid placing excessive weight or stress on them. Use proper adhesives if needed, and handle the furniture with care during movement. By staying proactive, you can reduce the risk of future damage, ensuring your mid-century pieces stay sturdy and beautiful for years to come.
Are There Specific Tools Recommended for Mid-Century Furniture Repair?
Think of choosing tools for furniture repair like picking the right keys to open a treasure. You’ll want a screwdriver set with various heads, a rubber mallet for gentle taps, and wood glue for bonding. Proper tools selection guarantees repair safety and precision. Always use the right tools for each task, and wear safety glasses. This approach keeps your project smooth and prevents accidents, helping your vintage piece regain its charm.
How Do I Match New Mounts to Original Furniture Finishes?
To match new mounts to your furniture’s original finish, start by selecting a matching stain that closely resembles the original color. Test the stain on a hidden area first. Guarantee finish compatibility by using similar sealants or topcoats. Lightly sand the area around the mounts to help the new finish blend seamlessly. With patience, you’ll achieve a cohesive look that preserves your furniture’s mid-century charm.
Can Damaged Tapered Legs Be Restored Without Replacement?
Like restoring a vintage painting, damaged tapered legs can often be brought back to life. You should use appropriate restoration techniques, such as sanding, filling, and refinishing, to repair minor damage. Material selection is vital; choose woods and finishes that match the original for seamless results. With patience and the right approach, you can preserve the charm of your furniture without the need for replacement.
Conclusion
Now that you’ve mastered repairing those mid-century tapered legs and mounts, you’re practically a furniture wizard. No more stressing over wobbly legs or scratched mounts—your pieces will look factory-fresh in no time! Imagine impressing everyone with your superpowers to restore vintage charm effortlessly. With just a little effort, you can turn back the clock on aging furniture, making it look as stunning as the day it was made. Get ready to dazzle everyone with your incredible restoration skills!