To install a whole-house water filter, start by evaluating your water quality and selecting a suitable filter. Gather essential tools like a wrench, Teflon tape, and fittings. Turn off the main water supply, locate the best spot near the water entry point, and prepare the area. Connect the filter system securely, check for leaks, and flush out the system. Following these steps helps ensure safe, clean water; if you keep going, you’ll learn more about proper installation techniques.
Key Takeaways
- Properly plan and select the right filter based on water testing and system capacity.
- Turn off the main water supply and prepare the work area before installation.
- Install the filter system near the water entry point, securing it properly and ensuring accessibility.
- Connect inlet and outlet fittings securely, then flush the system to remove debris.
- Regularly maintain the filter by flushing, inspecting for leaks, and replacing media as recommended.
Assessing Your Water Quality and Choosing the Right Filter

Before selecting a whole-house water filter, it’s essential to understand your water quality. Start with water testing to identify contaminants like chlorine, sediment, heavy metals, or bacteria. This step helps determine the right filter type and capacity. Knowing what’s in your water allows you to choose a system that effectively addresses your specific needs. Additionally, consider the long-term filter maintenance; some filters require frequent cartridge replacements, while others last longer. Regular filter maintenance ensures your system functions properly and keeps your water clean. Once you’ve tested your water and understood its composition, you can select a filter that targets those pollutants, guaranteeing safe, great-tasting water throughout your home. Proper assessment improves filter effectiveness and saves you money while guaranteeing superior water quality.
Gathering Necessary Tools and Materials

To guarantee a smooth installation process, gather all necessary tools and materials ahead of time. You’ll need items for connecting, securing, and maintaining your filter while monitoring water pressure. Here’s a quick list:
| Tool/Material | Purpose | Examples |
|---|---|---|
| Adjustable wrench | Tightening fittings | Adjustable wrench |
| Teflon tape | Seal connections | Teflon tape |
| Pipe cutter | Cutting pipes | Pipe cutter |
| Replacement filter | Filter maintenance | Suitable filter for your system |
| Pressure gauge | Monitoring water pressure | Digital or analog gauge |
Having these ready ensures smooth installation and ongoing filter maintenance, helping you keep ideal water pressure and clean water supply. Proper preparation also reduces the risk of leaks and equipment damage during installation, ensuring effective system performance.
Turning Off Water Supply and Preparing the Work Area

Turning off the water supply is a crucial first step to prevent water flow during installation and avoid potential messes. Locate the main shutoff valve, usually near your water meter or where the main pipe enters your home. Turn it clockwise to shut off water flow, which will stop water pressure from building up. Be aware that different pipe materials—copper, PVC, or PEX—may require different tools or techniques to disconnect. Before starting work, open a faucet downstream to drain remaining water and relieve pressure. Clear the work area of any items that could get damaged or obstruct your access. Having everything prepared ensures a smooth installation process and minimizes water damage or frustration caused by unexpected leaks or pressure issues. Additionally, understanding the water supply system can help you troubleshoot potential issues more effectively.
Locating the Optimal Installation Site

Choosing the right spot for your whole-house water filter is vital for effective performance and easy maintenance. You want a location that’s accessible, close to the main water line, and protected from extreme temperatures. Avoid areas prone to freezing or excessive heat, which can damage the system. Proper drain placement is also essential; ensure there’s a nearby drain or floor drain for easy disposal of excess water or maintenance runoff. Using pipe insulation around the filter and connected pipes helps prevent freezing and reduces heat loss. Here’s a quick guide:
| Location Factors | Benefits | Considerations |
|---|---|---|
| Accessibility | Easier filter maintenance | Keep within reach |
| Temperature Control | Prevents freezing or overheating | Avoid unheated spaces |
| Drain Proximity | Simplifies drainage, avoids leaks | Install near drain points |
Additionally, incorporating AI-powered monitoring systems can help track the filter’s performance and alert you to maintenance needs proactively.
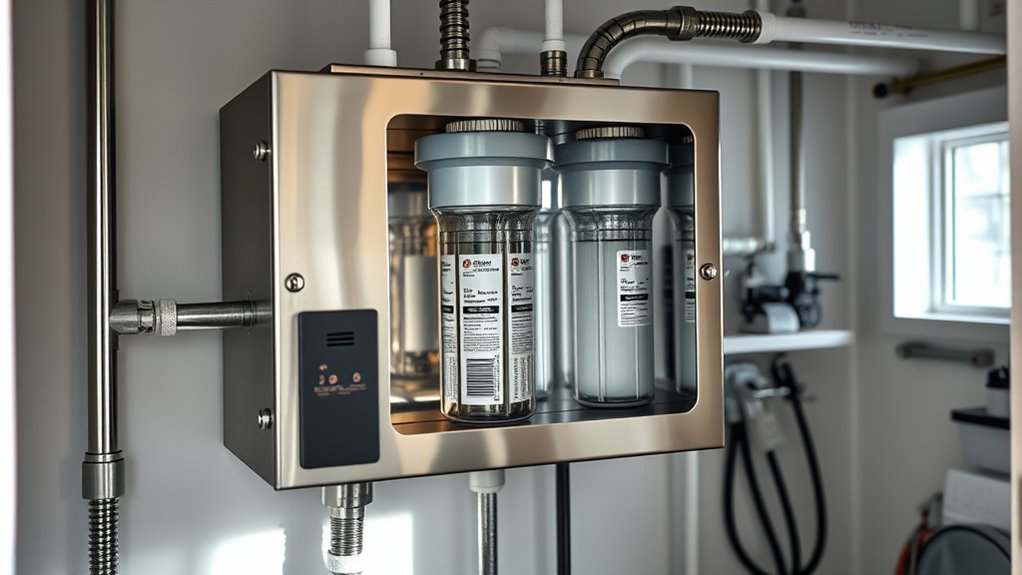
Installing the Filter System

Begin by gathering all necessary tools and components, including the filter unit, plumbing fittings, wrenches, and Teflon tape. Carefully mount the filter system in your chosen location, ensuring it’s secure and accessible for maintenance. As you install, double-check that the flow direction matches the manufacturer’s instructions. Once connected, tighten fittings to prevent leaks, but avoid overtightening. Remember, proper installation impacts the filter’s lifespan, so take your time. Regular maintenance tips, like inspecting for leaks and replacing filters on schedule, help extend its life and guarantee peak performance. After installation, test the system by turning on the water supply, checking for leaks, and confirming proper operation. Proper installation now sets the foundation for reliable, clean water and easier future maintenance. Additionally, understanding the industrial juice manufacturing process can help you appreciate the importance of water quality in beverage production.
Connecting the Water Lines to the Filter

To connect the water lines to the filter, start by turning off the main water supply to prevent leaks or water damage. Next, use appropriate pipe fittings to attach the inlet and outlet lines securely to the filter. Confirm the fittings are tight but avoid over-tightening, which can damage them. As you connect the lines, check the water pressure to ensure it’s within the filter’s specifications—high water pressure can cause leaks or damage, while low pressure may reduce filtration efficiency. Use a wrench for a snug fit, but handle fittings carefully to avoid cracking or stripping threads. Once connected, double-check all fittings and connections to make sure everything is secure before proceeding to the next step. Additionally, refer to water filtration system guidelines to ensure proper installation and optimal performance.
Testing the System for Leaks and Proper Operation

Turn on the water supply and watch for any drips or leaks around the connections. Check that water flows smoothly through the system and out of all faucets. Finally, inspect the filter to guarantee it’s functioning properly and providing clean, clear water. Ensure that proper maintenance is performed regularly to keep the system operating efficiently.
Check for Drips
Before fully operating your water filter system, it’s essential to check for drips to guarantee everything is sealed correctly. Perform a thorough drip inspection around all connections, fittings, and valves. Look closely for any signs of water escaping or pooling, which could indicate a leak. Use leak detection techniques, such as wiping connections dry and watching for moisture or running your hand along fittings to feel for moisture. Make sure all fittings are tight but not over-tightened, as this can cause damage. Pay special attention to areas where pipes connect to the filter unit. Address any drips immediately by tightening fittings or replacing faulty washers. Proper leak detection now prevents water damage and ensures your whole-house filter operates efficiently. Additionally, understanding system setup can help identify potential issues before they occur.
Verify Water Flow
How can you be sure your whole-house water filter system is working correctly? First, turn on the water and observe the water pressure. It should be steady and consistent, not weak or fluctuating. Check the flow rate by running water from different fixtures throughout your house. If the flow seems sluggish or inconsistent, it may indicate a blockage or improper installation. Listen for any unusual noises that could suggest leaks or air in the system. Inspect all connections for drips or leaks. Ensuring the water pressure remains ideal and the flow rate is adequate confirms your system operates properly. Additionally, observing remote work benefits such as increased focus and efficiency can help you stay motivated during maintenance checks. Taking these steps helps verify that your water filter is functioning efficiently and that your home’s water supply remains clean and reliable.
Assess Filter Quality
After verifying that your water flow remains steady and consistent, it’s important to assess the filter’s overall quality by checking for leaks and ensuring proper operation. Inspect all connections and housings for drips or moisture, which could indicate faulty seals. Confirm that the filter media is correctly installed and functioning as intended. Also, evaluate the system’s performance by monitoring water pressure and clarity. To maintain ideal performance, follow your maintenance schedule diligently, replacing filter media as recommended. Regular checks help prevent clogging and ensure water quality remains high. Keep an eye out for:
- Leaks around fittings and housings
- Proper flow rate and pressure
- Absence of strange odors or discoloration
- Integrity of filter media installation
- Adherence to maintenance schedule for replacements
- Monitoring filter media performance to ensure optimal filtration efficiency
Flushing the Filter and Restoring Water Supply

Once you’ve completed the filter installation, it’s essential to flush the system to remove any trapped debris or air pockets. Turn on the main water supply and open a nearby faucet to allow water to flow through the filter. Let the water run for several minutes until it clears and runs smoothly. This process helps prevent damage and extends your filter’s lifespan. Regular maintenance tips include flushing the filter periodically to ensure ideal performance. After flushing, close the faucet and restore normal water flow to your entire house. Taking these steps prevents buildup and keeps your whole-house water filter functioning efficiently. Proper flushing not only maintains water quality but also prolongs the filter’s lifespan, saving you money in the long run.
Frequently Asked Questions
How Often Should I Replace the Filter Cartridges?
You should replace your filter cartridges based on their filter lifespan and replacement schedule, which typically ranges from three to six months. Regularly check for signs of reduced water flow or taste issues, as these indicate it’s time for a change. Keep in mind, factors like water quality and usage can affect how often you need to replace the filters, so stay attentive to guarantee peak performance.
Can I Install a Whole-House Filter Myself Without Professional Help?
Imagine tackling a complex puzzle, where each piece must fit perfectly. Installing a whole-house filter yourself presents DIY challenges that can be tricky, especially if you’re unfamiliar with plumbing. While you can attempt it, professional installation guarantees the job’s done right and prevents leaks or damage. If you’re comfortable with tools and plumbing, you might manage, but consulting a pro can save you time and future hassle.
What Are Signs That My Filter Needs Maintenance or Replacement?
You’ll notice your filter needs maintenance or replacement if your water taste worsens or if you see a drop in filter performance. Reduced flow rate, strange odors, or discolored water are clear signs. Regularly check for sediment buildup or clogs, and follow your manufacturer’s recommended schedule. Staying attentive to these signs helps guarantee your water stays clean, fresh, and safe, preventing potential damage to your plumbing system.
Will Installing a Filter Affect Water Pressure Throughout My House?
You might wonder if installing a filter affects your home’s water pressure, and the answer is yes, it can. A well-maintained filter usually preserves water pressure, but a clogged or aging filter can reduce it, making everyday tasks frustrating. To guarantee peak performance, monitor your water pressure regularly, understand your filter’s lifespan, and replace it promptly. Proper maintenance keeps your water flow steady and your filter working efficiently.
Are There Specific Local Regulations or Permits Required for Installation?
You should check local building codes and permit requirements before starting installation. Many areas require permits for major plumbing work, including whole-house water filters, to guarantee safety and compliance. Contact your city or county building department to confirm specific regulations. Failing to obtain necessary permits could lead to fines or issues if you sell your home later. Always follow local guidelines to avoid complications and ensure a smooth installation process.
Conclusion
Think of your whole-house filter as a guardian patrolling your home’s water supply. Once installed, it stands ready to defend against impurities, ensuring every drop reaching your taps is pure and safe. Like a vigilant sentinel, it works silently in the background, giving you peace of mind with every shower and sip. With proper setup, you’re creating a fortress of clean water—protecting your home and health, one filtered drop at a time.