To replace your dining chair webbing or straps, start by carefully removing the old webbing using pliers to pry up the staples. Then, cut new webbing to fit the seat frame, positioning it evenly and pulling it tight before stapling it securely at regular intervals. Make sure the webbing is taut but not overstretched for proper support. If you want detailed steps and tips, there’s more to explore on how to get perfect results.
Key Takeaways
- Remove old webbing and staples carefully using pliers, keeping or replacing staples as needed.
- Measure and cut new webbing to fit the chair frame, ensuring enough length for proper tension.
- Position the webbing evenly across the frame, starting from the center of each side.
- Pull the webbing taut and staple every 1-2 inches, working outward to ensure proper tension.
- Check for even tension and smoothness, adjusting as necessary before finalizing the stapling.
If your dining chair webbing has become saggy or torn, replacing it is a straightforward way to restore comfort and support. Over time, regular use causes webbing to weaken or stretch, making your chair less stable and uncomfortable. Fortunately, replacing the webbing isn’t complicated, especially if you have some basic tools and patience. The key is to focus on proper webbing tension to guarantee your chair feels firm and supportive once again.
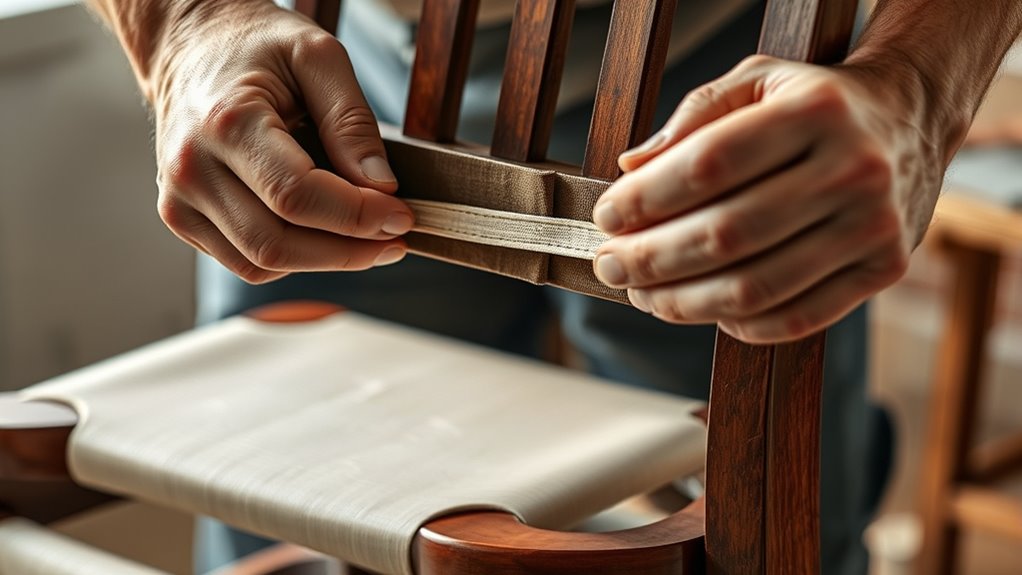
Start by removing the old webbing. Use pliers to carefully pry up the upholstery staples holding it in place. As you work, keep the staples intact if you plan to reuse them, but don’t hesitate to replace any that are bent or broken. When you’re ready to install the new webbing, position it across the frame, making sure it’s evenly spaced and taut. The goal is to achieve a snug fit without overstretching the webbing, which can compromise its strength over time. To do this, you’ll need to manage the webbing tension carefully.
Begin stapling the webbing in the center of each side, then work your way outward, pulling the webbing tight before inserting each upholstery staple. This method ensures consistent tension across the entire webbing surface. Use a staple gun with sharp staples designed for upholstery work, and place the staples at regular intervals—roughly every 1 to 2 inches. As you staple, check the webbing tension frequently by pressing down on the surface. It should feel firm but not overly tight, which could cause the webbing to snap or warp. Proper tension is vital for comfort and longevity. Too loose, and your chair will sag again; too tight, and it may crack or break under weight.
Throughout the process, pay close attention to the alignment of the webbing. It should run straight and flat across the seat frame. Adjust as needed by pulling or loosening the webbing before stapling. Once all sides are secured, double-check the tension and smoothness of the webbing surface. A well-installed webbing surface will support weight evenly and feel comfortable when you sit. Additionally, using appropriate webbing materials can greatly enhance the durability of your repair.
Replacing your dining chair webbing isn’t just about fixing a saggy seat; it’s about restoring the chair’s original comfort and stability. When done correctly, it saves you money and extends the life of your furniture. Focus on maintaining proper webbing tension and using quality upholstery staples, and you’ll enjoy a sturdy, comfortable chair for years to come.
Frequently Asked Questions
How Long Does It Take to Replace Dining Chair Webbing?
Replacing dining chair webbing typically takes about 1 to 3 hours, depending on your experience and chair condition. You’ll want to assess the webbing’s durability first, as it influences the restoration process. Using proper chair restoration techniques ensures a secure fit and longer-lasting results. With patience and careful work, you can efficiently replace webbing, restoring your chair’s comfort and appearance while preserving its value.
Can I Replace Webbing Without Removing the Chair Frame?
Did you know that most webbing replacement projects take about 1-2 hours? You can replace the webbing without removing the chair frame, but it’s tricky. To do it properly, you need enough space to work around the frame. If the frame is tight or inaccessible, removing it makes the process easier and guarantees a smooth, secure replacement. So, assess your chair’s design before deciding.
What Tools Are Needed for Replacing Chair Webbing?
You’ll need basic tools like a staple remover, a hammer, and a staple gun to replace chair webbing. The tool requirements depend on the webbing types, such as polyester or nylon, so make sure your staple gun is compatible. You might also need scissors or pliers. With these tools, you can remove old webbing and secure new webbing tightly, ensuring your chair stays sturdy and comfortable.
How Much Does Professional Webbing Replacement Typically Cost?
Like a seasoned artist choosing their palette, professional webbing replacement costs vary based on material options and the chair’s complexity. You can expect pricing estimates ranging from $50 to $150 per chair, depending on the quality of webbing and labor. High-end materials or intricate designs may push costs higher. To get an accurate quote, compare local upholstery specialists, considering their experience and the webbing options they offer.
Is It Possible to Upgrade to More Durable Webbing Materials?
Yes, you can upgrade to more durable webbing material. Many upgrade options are available, such as nylon or polyester, which offer increased strength and longevity compared to standard materials. You should consider your chair’s usage and environment to choose the best webbing material. Upgrading is a smart way to extend your chair’s lifespan and improve comfort, making it a worthwhile investment.
Conclusion
Replacing your dining chair webbing or straps might seem like a small fix, but it transforms the entire look and comfort of your space. Just like a sturdy frame supports a beautiful portrait, fresh webbing supports your everyday moments. Don’t settle for worn-out, sagging chairs—revive them with a simple update. After all, a little effort now can bring new life to your dining area, proving that even small changes can make a big difference.