In 2025, I've found the 15 best kegerators that'll elevate your home bar. From the Kegco K309SS-1's spacious capacity to the compact EdgeStar KC2000, there's a model for every need. I love the HCK Outdoor Kegerator for its versatility as both a kegerator and refrigerator. Each option boasts unique features like efficient cooling, user-friendly designs, and quiet operation, so you're sure to enjoy fresh draft beer at home. If you're curious about the pros and cons of each model and key factors to examine, you might want to keep exploring!
Key Takeaways
- Evaluate capacity and keg compatibility to ensure the kegerator meets your needs for full-size or specialty kegs.
- Look for models with fan-forced cooling and digital controls for efficient temperature management and optimal beer freshness.
- Consider user-friendly features like mobility casters and easy assembly that enhance convenience and maintenance.
- Research Energy Star certified kegerators for increased energy efficiency and lower operating costs over time.
- Read customer reviews to gauge performance, reliability, and any potential noise concerns before making a purchase.
Kegco K309SS-1 Keg Dispenser, Stainless Steel

If you're someone who loves hosting gatherings and wants to serve perfectly chilled beer without the hassle of traditional keg setups, the Kegco K309SS-1 Keg Dispenser is an excellent choice. This freestanding keg refrigerator boasts a spacious 5.6 cubic feet capacity, easily accommodating full-size kegs or even multiple smaller ones. I appreciate its fan-forced cooling system that guarantees even temperature distribution, keeping my beer at a cool 32 degrees Fahrenheit. The digital controls make it a breeze to adjust settings, while the deep chill function rapidly cools kegs in no time. Plus, with features like removable drip trays and easy-rolling casters, it fits seamlessly into my home bar setup. This unit has truly elevated my entertaining experience!
Best For: Beer enthusiasts and hosts who want an efficient and stylish solution for serving chilled draft beer at home.
Pros:
- Spacious capacity allows for full-size kegs or multiple smaller kegs, perfect for gatherings.
- Fan-forced cooling system ensures even temperature distribution, keeping beer at optimal serving temperatures.
- Digital controls and deep chill function make temperature adjustments easy and quick, enhancing the user experience.
Cons:
- Some users report noise levels that may be disruptive in quieter environments.
- Issues with initial cooling performance can occur, requiring patience during setup.
- Customer service response times may be slower than expected for warranty or maintenance inquiries.
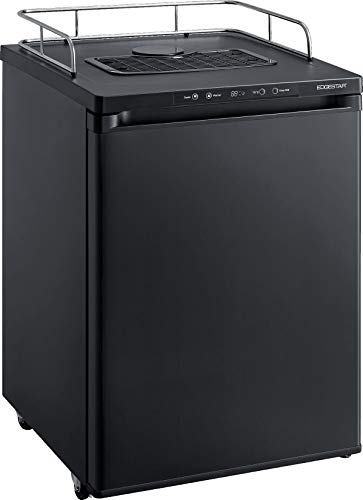
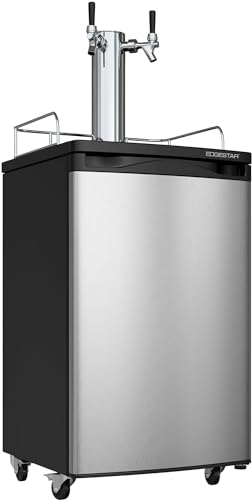
EdgeStar KC2000 Full Size Kegerator and Keg Beer Cooler

The EdgeStar KC2000 Full Size Kegerator and Keg Beer Cooler stands out as an excellent choice for homebrewers and beer enthusiasts who crave the convenience of having fresh draft beer at home. Its compact dimensions make it easy to fit in various spaces while holding both 1/4 and 1/2 kegs. I appreciate the quick temperature recovery, keeping my beer at a perfect 38°F. Plus, the assembly is straightforward and takes about 30 minutes. While it generally operates quietly, a few users report some noise. Regular cleaning and defrosting will help maintain performance. Overall, this kegerator offers great value, especially for those looking to elevate their home brewing and drinking experience.
Best For: Beer enthusiasts and homebrewers looking for a reliable and compact kegerator to enjoy fresh draft beer at home.
Pros:
- Easy to assemble in about 30 minutes with clear instructions.
- Maintains a consistent temperature around 38°F with quick recovery.
- Compact design fits well in various spaces while accommodating standard kegs.
Cons:
- Some users experienced issues with the keg coupler not locking properly.
- Occasional noise complaints, though generally tolerable.
- Durability concerns with reported motor failures after a few years of use.
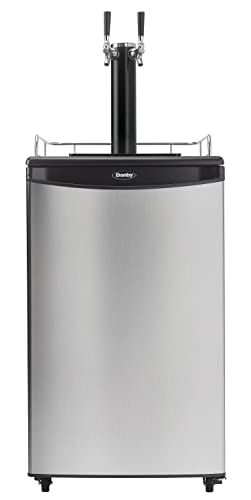
Kegco Kegerator, Dual Tap, Stainless Steel

For anyone who loves entertaining at home, the Kegco Kegerator, Dual Tap, Stainless Steel, stands out as an ideal choice. This sleek and elegant kegerator not only boasts a modern design but also offers impressive functionality. With a digital temperature display, you can easily set and verify the perfect beer temperature. It accommodates various keg sizes, from a full 1/2 barrel to three homebrew kegs, making it versatile for any occasion.
I appreciate the deep chill function that rapidly cools warm kegs, ensuring my drinks are always invigorating. While some users mention setup challenges, I found that watching YouTube tutorials helped immensely. With a solid customer rating of 4.5 stars, the Kegco Kegerator is truly a fantastic investment for beer enthusiasts like me.
Best For: Home entertainers and beer enthusiasts looking for a versatile and stylish kegerator to serve a variety of keg sizes.
Pros:
- Convenient digital temperature control for precise beer chilling.
- Versatile keg capacity accommodating multiple sizes, including homebrew kegs.
- Elegant design with features like a removable drip tray and easy-rolling casters.
Cons:
- Initial setup can be challenging, with unclear instructions noted by some users.
- Potential for minor leaks if neoprene washers are not properly used.
- CO2 level adjustments may be necessary for optimal operation.
Kegco K309B-1 Kegerator Black, 2 Faucet

Crafted for beer enthusiasts who appreciate versatility, the Kegco K309B-1 Kegerator stands out with its two-faucet design, allowing you to serve different brews simultaneously. With a spacious 5.6 cubic feet capacity, it accommodates any full-size keg, making it perfect for hosting gatherings. I love the digital temperature display and fan-forced cooling, which keeps my beer at a revitalizing 32 degrees Fahrenheit. Plus, the Deep Chill Function is a game-changer for quickly cooling warm kegs. The easy-rolling casters let me move it around effortlessly, and the removable drip tray makes cleaning a breeze. Overall, I find it incredibly efficient and user-friendly, making my home draft experience enjoyable every time.
Best For: Beer enthusiasts and home entertainers who appreciate the convenience of serving multiple brews at once.
Pros:
- Efficient cooling with a digital temperature display and fan-forced technology for even distribution.
- Versatile capacity that accommodates various keg sizes, perfect for parties and gatherings.
- User-friendly design featuring easy-rolling casters and a removable drip tray for simple maintenance.
Cons:
- Height limitations may restrict the use of certain keg fittings.
- Noise levels can be a concern for some users during operation.
- Missing parts have been reported, potentially leading to delays in setup.
3.4 CF Beer Kegerator Draft Beer Dispenser

Looking for a versatile kegerator that fits seamlessly into your lifestyle? The 3.4 CF Beer Kegerator Draft Beer Dispenser by TROPOW might be just what you need. With dimensions of 25L x 24W x 45.5H inches, it has a spacious interior that accommodates a Sixth Barrel Keg, perfect for home use or parties. I love the thermostatic control that keeps my beer between 32°F and 50°F effortlessly. Plus, it doubles as a refrigerator with an adjustable rack for food. It's durable, thanks to its stainless steel build and high-quality components, and the ultra-quiet cooling technology is a bonus. Cleaning is a breeze with the removable drip tray. Overall, this kegerator's functionality and ease of use make it a standout choice!
Best For: Homeowners and party enthusiasts looking for a compact and versatile kegerator that can also function as a refrigerator.
Pros:
- Spacious interior that accommodates a Sixth Barrel Keg, ideal for gatherings.
- Thermostatic control allows for precise temperature management between 32°F and 50°F.
- Durable stainless steel construction ensures longevity and easy maintenance with a removable drip tray.
Cons:
- Limited customer ratings may indicate a lack of extensive user feedback.
- Concerns about delivery and product condition upon arrival reported by some users.
- Only supports one keg size which may not meet the needs of larger parties or events.
EdgeStar 24 Inch Wide Kegerator Conversion Refrigerator
The EdgeStar 24 Inch Wide Kegerator Conversion Refrigerator stands out as an excellent choice for homebrewers and beer enthusiasts who want to elevate their at-home draft experience. With a capacity of 5.6 cubic feet, it holds various keg sizes, including up to three sixth barrel kegs or Cornelius kegs. Its intuitive temperature control ranges from 32°F to 50°F, and the Deep Chill Mode guarantees your new keg cools quickly. I appreciate the stainless steel door and the included accessories like the drip tray and mobility casters. Rated 4.4 stars, users love its quiet operation and efficiency. Just be aware of potential shipping issues. Overall, it's a fantastic option for anyone serious about home draft beer.
Best For: Beer enthusiasts and homebrewers looking for a reliable and efficient kegerator to enhance their at-home draft experience.
Pros:
- Efficient Cooling: Intuitive temperature control allows for quick adjustments and includes a Deep Chill Mode for rapid cooling of new kegs.
- Versatile Keg Capacity: Can accommodate various keg sizes, including up to three sixth barrel kegs or Cornelius kegs.
- User-Friendly Design: Features included accessories like a drip tray and mobility casters for easy setup and maintenance.
Cons:
- Shipping Concerns: Some customers have reported issues with shipping damage upon delivery.
- Caster Fit Difficulty: There are complaints regarding the challenge of fitting the mobility casters properly.
- Weight: At 140 pounds, the unit may be cumbersome to move or reposition without assistance.
Danby Double Tap Kegerator (5.4 Cu.Ft.)
If you're a beer enthusiast who values both style and functionality, the Danby Double Tap Kegerator (5.4 Cu.Ft.) is an excellent choice. With its sleek spotless steel finish and scratch-resistant worktop, it not only looks great but also fits perfectly in any space. The dual tap system allows you to serve two different beers, making it ideal for entertaining. I appreciate the reversible door hinge and included components, like the CO2 tank and regulator, which streamline my setup. While it maintains a cool 41°F, some users report temperature consistency issues. Overall, this kegerator's combination of design and performance makes it a solid investment for any beer lover looking to elevate their home brewing experience.
Best For: Beer enthusiasts who want a stylish and functional kegerator for home brewing and entertaining.
Pros:
- Sleek design with a spotless steel finish that complements any decor.
- Dual tap system allows serving of two different beers simultaneously.
- Includes essential components like a CO2 tank and regulator for easy setup.
Cons:
- Temperature consistency issues reported by some users.
- Assembly required for the tap system, which may be a hassle for some.
- Mixed reviews on customer service responsiveness and issue resolution.
EdgeStar KC1000SS Craft Brew Kegerator for 1/6 Barrel and Cornelius Kegs

Craft beer enthusiasts seeking a compact and efficient solution will find the EdgeStar KC1000SS Craft Brew Kegerator to be an excellent choice. Designed for 1/6 barrel and Cornelius kegs, its sleek silver finish complements any home bar. With dimensions of 32.7 inches high and 17.5 inches wide, it fits snugly in smaller spaces. The kegerator features a digital thermostat, internal blue LED lighting, and a 2.5-inch stainless steel beer tower, ensuring your brew stays fresh and cool. While users praise its easy assembly and good cooling performance, some report thermostat inaccuracies and occasional foam issues on the first pour. Overall, this kegerator is perfect for those wanting to enjoy draft beer at home.
Best For: Craft beer enthusiasts looking for a compact and efficient kegerator to enjoy draft beer at home.
Pros:
- Compact size makes it ideal for smaller spaces.
- Easy assembly allows for quick setup and use.
- Digital thermostat and internal blue LED lighting ensure optimal cooling and visibility.
Cons:
- Thermostat inaccuracies can make it difficult to achieve the desired beer temperature.
- Foam issues on the first pour may occur, requiring adjustments.
- Insulation in the tower may restrict airflow, affecting beer quality.
Kegco Full Size Kegerator Refrigerator

Looking for a kegerator that combines style and functionality? The Kegco Full Size Kegerator Refrigerator is an excellent choice. With its sleek black cabinet and stainless steel door, it adds a modern touch to any space. It can hold one full-size keg or multiple smaller kegs, giving you versatility for your favorite brews. The included keg tapping kit makes setting it up a breeze, and the ultra-quiet operation guarantees it won't disrupt your home. I appreciate the adjustable temperature control, although some users note a max cooling temp of 42 degrees can lead to foaming. Overall, this kegerator offers reliable performance, easy mobility, and long-lasting enjoyment for any beer enthusiast.
Best For: Beer enthusiasts seeking a stylish and versatile kegerator for home use.
Pros:
- Sleek design with a black cabinet and stainless steel door enhances any decor.
- Versatile keg storage options accommodate various keg sizes and types.
- Ultra-quiet operation allows for discreet use in home environments.
Cons:
- Maximum cooling temperature of 42 degrees can lead to excessive foaming for some users.
- Empty CO2 tank requires local filling, which may be inconvenient.
- Weight of 75.8 pounds may hinder mobility for some users without assistance.
VEVOR Beer Kegerator, Dual Tap Draft Beer Dispenser

The VEVOR Beer Kegerator, with its dual tap draft beer dispenser, is perfect for homebrewers or anyone who loves entertaining guests. Measuring 21.7 x 20.7 x 33.2 inches and weighing 102.6 pounds, it holds up to 152 liters (40 gallons) of your favorite brews. I appreciate its temperature control, ranging from 32°F to 50°F, ensuring my beer stays perfectly chilled. The kegerator accommodates various keg sizes and includes a convenient external CO₂ tank bracket. Plus, with four wheels for mobility, I can easily move it around my space. While some users mention assembly challenges, I find its sleek design and functionality make it a great choice for enjoying draft beer at home.
Best For: Homebrewers and entertaining enthusiasts looking for a reliable dual tap draft beer dispenser.
Pros:
- Spacious interior accommodates various keg sizes, making it versatile for different brewing needs.
- Temperature control ranging from 32°F to 50°F ensures optimal beer freshness.
- Mobility features with four wheels and a locking front wheel for easy positioning in any space.
Cons:
- Mixed customer reviews indicate potential functionality and design issues.
- Assembly challenges have been reported, making setup difficult for some users.
- Temperature control complaints suggest inconsistent performance in maintaining desired beer temperatures.
EdgeStar Full Size Stainless Steel Dual Tap Kegerator & Draft Beer Dispenser
If you're someone who enjoys entertaining guests with cold, fresh beer on tap, the EdgeStar Full Size Stainless Steel Dual Tap Kegerator is an excellent choice. This sleek model not only holds one full-sized half shell keg or two sixth kegs, but its rolling casters make it easy to move around. With a temperature range in the low 30s to mid 40s, your beer stays perfectly chilled. Many users rave about its effective temperature control and the versatility of having two beers on tap. However, I recommend upgrading the faucets and drip tray for better performance. Despite some minor packaging issues, the overall quality and value make this kegerator a fantastic addition to any home bar setup.
Best For: Anyone who enjoys hosting gatherings and desires the convenience of having two types of beer on tap at home.
Pros:
- Easy mobility with rolling casters for versatile placement.
- Effective temperature control keeps beer chilled in the low 30s to mid 40s.
- Dual tap capability allows for serving two different beers simultaneously.
Cons:
- Some components, like the faucets, are considered cheap and may require upgrades.
- Minor packaging issues reported, leading to potential damage during shipping.
- The drip tray is small and may not function effectively without replacement.
VEVOR Beer Kegerator, Dual Tap Draft Beer Dispenser

For anyone seeking to elevate their home brewing experience, the VEVOR Beer Kegerator stands out as an exceptional choice. With a generous capacity of 162 liters, I can easily fit two 5-gallon kegs or a full-size keg, making it perfect for parties or personal use. The air cooling system guarantees rapid cooling while maintaining peak beer flavor, and the digital temperature control allows me to set the perfect chill between 23°F and 82.4°F. I appreciate the mobility provided by the bottom casters and the ease of cleaning with the drip tray. Plus, it comes with all necessary components, including a CO2 cylinder and installation tools. The 30-day return guarantee gives me peace of mind, too.
Best For: Home brewers and beer enthusiasts looking for a reliable and spacious kegerator for personal or party use.
Pros:
- Generous capacity accommodates multiple keg sizes, making it ideal for gatherings.
- Advanced cooling system ensures rapid cooling and preservation of beer flavor.
- User-friendly features like digital temperature control and easy mobility with casters enhance usability.
Cons:
- Heavy weight may make it difficult to move without assistance.
- Limited temperature range may not be suitable for certain beer styles that require specific conditions.
- Warranty details are not clearly specified, requiring customers to reach out for information.
Beer Kegerator, Single Tap Draft Beer Dispenser

Looking for a high-quality way to enjoy draft beer at home? The TROPOW Beer Kegerator, a single tap draft beer dispenser, might just be what you need. With its sleek black design and full-size keg refrigerator features, it fits seamlessly into any space. Measuring 17.5 x 20 x 48.4 inches, it has a generous 3.4 cubic feet capacity, allowing you to store your favorite brews. Its fan cooling system rapidly chills beer from 32°F to 50°F, ensuring a perfect pour every time. I appreciate the adjustable storage rack for versatility, and the included drip tray keeps my area tidy. Despite some assembly feedback, I find its price-value ratio and functionality hard to beat.
Best For: Home brewers and beer enthusiasts looking for a convenient way to enjoy draft beer in the comfort of their own space.
Pros:
- Large capacity allows for storing multiple kegs or a variety of beverages.
- Fan cooling system ensures rapid chilling for optimal beer temperature.
- Versatile functionality serves as both a draft beer dispenser and a refrigerator.
Cons:
- Quality control issues noted during assembly, leading to potential difficulties in setup.
- Inadequate instructions may require users to seek external resources for guidance.
- Mixed customer ratings suggest varying experiences with product reliability and performance.
EdgeStar KC2000SS Full Size Kegerator and Keg Beer Cooler

The EdgeStar KC2000SS Full Size Kegerator stands out as an ideal choice for serious beer enthusiasts seeking both quality and performance. With a sleek design and solid construction, it measures 48.5 x 20.1 x 24.81 inches and weighs 90 pounds. I love its impressive temperature range, keeping my beer perfectly chilled in the low 30s to mid 40s. It accommodates both 1/4 and 1/2 kegs, though it won't fit oversized or rubberized kegs. Users rave about its cooling efficiency and ease of use, making setup a breeze in just 30 minutes. While some adjustments for CO2 pressure may be needed, the overall durability and functionality make the EdgeStar a top pick for enjoying draft beer at home.
Best For: Serious beer enthusiasts looking for a reliable and efficient kegerator to enjoy draft beer at home.
Pros:
- Excellent cooling performance, maintaining temperatures in the low 30s to mid 40s.
- Easy to set up and use, with assembly taking about 30 minutes.
- Durable construction with ample interior space for standard kegs and beverages.
Cons:
- Does not accommodate oversized or rubberized kegs, limiting keg options.
- Initial CO2 pressure adjustment may require a learning curve for optimal dispensing.
- Some users reported minor issues with CO2 tank placement impacting space utilization.
HCK Outdoor Kegerator with 3 Taps

If you're someone who loves entertaining outdoors, the HCK Outdoor Kegerator with 3 Taps is a game changer. This versatile unit not only serves as a kegerator but also transforms into a refrigerator, holding a full-size keg or up to 161 cans. With its adjustable cooling system, you can maintain your drinks at the perfect temperature, ranging from 32°F to 50°F. I appreciate the smooth pour and balanced foam it delivers, ensuring my beer tastes fresh. Plus, it's mobile, thanks to the four casters. While some users mention noise and door reversal challenges, the overall build quality and performance shine. With a solid warranty, this kegerator is a reliable choice for any outdoor gathering.
Best For: Those who enjoy outdoor entertaining and want a reliable, versatile solution for serving cold beverages.
Pros:
- Versatile Design: Functions as both a kegerator and a refrigerator, accommodating a full-size keg or up to 161 cans.
- Adjustable Cooling: Maintains optimal drink temperatures with a range of 32°F to 50°F.
- Mobility: Easy to move around with four casters, including two that lock for stability.
Cons:
- Noise Level: Some users report that the noise level can be noticeable.
- Door Reversal Complexity: The instructions for reversing the door can be unclear, leading to frustration.
- Shelf Aesthetics: Wire shelves may not be as visually appealing compared to stainless steel options.
Factors to Consider When Choosing a Kegerator

When I'm choosing a kegerator, I think about several key factors that can make or break my experience. Size and capacity, cooling technology, and keg compatibility all play a big role in my decision. Plus, I can't overlook features, accessories, and energy efficiency, as they can really enhance my setup.
Size and Capacity
Choosing the right size and capacity for a kegerator can make all the difference in your brewing experience. I've found that kegerators come in various dimensions, ranging from compact models at about 17.5 x 20 x 48.4 inches to larger ones measuring 48.5 x 20.1 x 24.8 inches. It's vital to evaluate how much space you have available.
Capacity is another key factor. Some kegerators hold just a single sixth barrel, while others can accommodate a full-size keg or multiple smaller kegs. Most models I've seen have around 5.6 cubic feet of storage, which offers great versatility for different beer types.
Keep in mind that kegerators vary in weight, from about 65 pounds to over 132 pounds, which affects how easily you can move them. Finally, check for keg compatibility. Some models might not support certain kegs, especially rubberized or oversized ones, so it's important to know what types of kegs your favorite brands offer. By evaluating these size and capacity factors, you can find the perfect kegerator that fits your needs and enhances your home brewing experience.
Cooling Technology
Understanding cooling technology is essential for getting the most out of your kegerator. The cooling system directly affects the taste and freshness of your beer, so knowing what to look for can make a big difference. I've found that fan-forced cooling systems are a great option, as they guarantee an even temperature throughout the unit. Many kegerators can be set as low as 32°F, which is perfect for keeping your beer ice cold and flavorful.
Some models also feature a Deep Chill function, allowing you to rapidly cool warm kegs by running the compressor continuously for about 24 hours. This is especially handy when you're in a hurry to serve fresh beer. Additionally, look for automatic defrost features, which help maintain temperature consistency and reduce maintenance by preventing ice build-up.
Lastly, energy consumption is something I always consider. Most kegerators operate between 287 to 310 kilowatt-hours annually, impacting both energy efficiency and your operating costs. By being mindful of these factors, you can choose a kegerator that not only delivers great beer but also fits your lifestyle and budget.
Keg Compatibility
After you've got a handle on cooling technology, the next thing to contemplate is keg compatibility. Not all kegerators are created equal, and their ability to hold different keg sizes varies considerably. Some models are designed specifically for standard US kegs, while others can accommodate smaller options like sixth barrels or Cornelius kegs. It's vital to check the specifications of the kegerator you're considering to verify it can support the keg type you prefer.
For instance, some kegerators may not fit rubberized or oversized kegs, which can be a bummer if you've got a specific favorite in mind. If you enjoy variety, look for models that can hold multiple smaller kegs, such as two 5-gallon D system kegs or three 5-gallon Cornelius ball lock kegs.
Additionally, understanding the keg tapping system is imperative. Some kegerators come with specific couplers, like the D or S system, which will dictate which kegs you can use. Finally, consider features like a deep chill function, which can rapidly cool warm kegs—a real game-changer if you frequently switch out different keg types.
Features and Accessories
When it comes to selecting the right kegerator, considering the features and accessories can make a significant difference in your brewing experience. First, I always check the keg compatibility; it's vital that the kegerator can accommodate the types of kegs I plan to use, whether they're full-size, slim, or homebrew kegs.
Next, I look for temperature control features. A digital thermostat with a range from 32°F to 50°F allows me to maintain ideal beer freshness. The cooling system type is also important; I prefer fan-forced cooling for even temperature distribution or deep chill functions to rapidly cool warm kegs.
I also evaluate the inclusion of essential accessories like CO2 tanks, regulators, and keg tapping kits. These can enhance my overall experience and save me from additional purchases. Finally, convenience features such as removable drip trays, easy-rolling casters, and guard rails make using and maintaining the kegerator much easier.
Energy Efficiency
Choosing the right features and accessories for my kegerator sets the stage for a great brewing experience, but energy efficiency is just as important. I've learned that many kegerators consume between 287 to 310 kilowatt-hours annually, which can really add up on my electricity bill. That's why I've made it a priority to look for models with Energy Star certification. These kegerators promise reduced energy consumption without sacrificing performance.
I also pay attention to features like adjustable thermostats and deep chill functions. They let me set the temperature just right for my needs, avoiding unnecessary energy use. The type of cooling system matters too; fan-forced cooling can help maintain even temperatures, which can further cut down on energy consumption.
Regular maintenance is key as well. Cleaning and defrosting my kegerator not only keeps my beer tasting great but also helps sustain its energy efficiency. By taking these factors into account, I'm not just ensuring great beer but also making a smart investment that saves me money in the long run.
Warranty and Support
While selecting a kegerator, it's vital to take into account the warranty and support offered by the manufacturer. A solid warranty can provide peace of mind, especially when many models come with a 90-day labor and 1-year parts warranty. I always check the warranty length and coverage, particularly for non-consumable parts versus the compressor. Some manufacturers even offer extended warranties for certain components, which can be a huge plus.
I recommend looking for brands that provide a warranty upon request. This often indicates better customer service, which is significant if you run into issues. Investigating the manufacturer's customer service reputation is also important; timely responses can make a world of difference during warranty claims.
Additionally, consider the return policies. Some retailers, like Amazon, offer a 30-day return guarantee, which allows for easy returns if the kegerator doesn't meet your expectations. By paying attention to these factors, you can guarantee that you choose a kegerator that not only satisfies your needs but also has reliable support in case something goes wrong.
Frequently Asked Questions
How Do I Clean and Maintain My Kegerator?
Cleaning and maintaining my kegerator is essential for great-tasting beer. I usually start by disconnecting the keg and removing all the parts, like the tap and lines. I wash these with warm soapy water, making sure to rinse thoroughly. I also wipe down the interior and exterior with a mild cleaner. Every few months, I check the CO2 tank and pressure settings. Regular maintenance keeps my beer fresh and my kegerator in top shape!
Can I Use a Kegerator for Homebrewed Beer?
Absolutely, you can use a kegerator for homebrewed beer! I've done it myself, and it's a fantastic way to enjoy your creations. Just make sure your beer is carbonated properly before filling the keg. I also recommend sanitizing everything thoroughly to avoid contamination. Once it's set up, you'll love the convenience of pouring fresh draft beer right from your own brews. It's a game changer for homebrewers like us!
What Type of Keg Sizes Are Compatible With Kegerators?
Picture a sleek kegerator standing proudly in my kitchen, ready to pour cold, invigorating drafts. When it comes to keg sizes, I've found that most kegerators accommodate full-size kegs (15.5 gallons), half-size kegs (7.75 gallons), and even smaller quarter kegs (5 gallons). Some models can even fit mini kegs (1.32 gallons). So, whether I'm hosting a party or enjoying a quiet evening, there's a perfect keg size for every occasion.
How Long Does Beer Stay Fresh in a Kegerator?
I've found that beer can stay fresh in a kegerator for about 30 to 45 days, depending on the type of beer and how well it's maintained. For instance, lighter beers might lose their freshness sooner, while stronger ones can last a bit longer. I always make sure to keep the kegerator at the right temperature and clean the lines regularly to maximize freshness. Enjoying a perfectly chilled pint is worth the effort!
Are Dual Tap Kegerators Worth the Investment?
I've found that dual tap kegerators are definitely worth the investment if you enjoy variety. With two taps, I can have different beers on draft at the same time, which keeps things interesting for me and my guests. Plus, they save space compared to having multiple kegs. I love being able to switch between a stout and a lager without any hassle. If you're a beer lover, I'd say go for it!
Conclusion
In the world of home brewing, the right kegerator can make all the difference. As they say, "Good things come to those who wait," but with these top picks, you won't have to wait long for that perfect pour. Whether you're throwing a party or enjoying a quiet night in, investing in a quality kegerator elevates your beer experience. So go ahead, choose the one that suits you best, and get ready to enjoy delicious draft beer right at home!