The key to a perfect paint finish is thorough surface preparation. Start by evaluating and cleaning your surface to guarantee proper adhesion, then mask off areas to protect surroundings. Select the right primer for your surface type, and smooth imperfections with sanding. Keep your workspace dust-free, and apply primer and paint evenly. Skipping these steps can lead to peeling or uneven results. Keep going to discover how each step makes a real difference in quality.
Key Takeaways
- Proper surface cleaning and assessment ensure optimal paint adhesion and a smooth, flaw-free finish.
- Masking and dust control prevent contamination and sharp lines, enhancing the final appearance.
- Choosing and applying the right primer prepares the surface, improving durability and paint longevity.
- Sanding rough spots and imperfections creates a smoother surface for an even, professional-looking finish.
- Addressing common issues like high humidity and using quality products prevents peeling and ensures lasting results.

Car Surface Prep Spray – Panel Wipe & Pre-Paint Degreaser for Ceramic Coating, PPF, Vinyl Wrap – Removes Wax, Grease, Silicone – Fast Drying, No Residue – Safe on Clear Coat – Towel Included-5oz
【Fast & Effective Cleaning】Quickly dissolves grease, wax, oil, and stubborn residues in one step. Leaves a perfectly clean…
As an affiliate, we earn on qualifying purchases.
As an affiliate, we earn on qualifying purchases.
Why Proper Paint Preparation Ensures a Flawless Finish

Proper paint preparation is essential because it creates a smooth, clean surface that allows the paint to adhere evenly and last longer. When you prepare your surface properly, you improve surface bonding, which is vital for a durable, flawless finish. Clean, smooth surfaces promote better paint adhesion, preventing issues like peeling, cracking, or bubbling over time. Additionally, understanding the role of contrast ratio in projectors highlights how critical surface quality is for optimal image display. Surface smoothness and texture directly influence how well paint settles and covers the surface, impacting the final appearance. By taking the time to prep correctly, you ensure that the paint bonds securely to the surface, resulting in a professional-looking finish that maintains its integrity longer. Proper preparation doesn’t just improve appearance—it also saves you time and money by reducing the need for touch-ups or repainting in the future. Paying attention to surface smoothness can significantly impact the final outcome and longevity of your paint job. In fact, a well-prepared surface can also help you achieve a more even paint coverage, making the entire process more efficient and ensuring a superior finish. Recognizing the importance of surface condition can help you avoid common painting pitfalls and achieve a truly flawless result.

1 Quart Bulls Eye 1-2-3 Primer Sealer Stain Killer
Designed for interior and exterior surfaces
As an affiliate, we earn on qualifying purchases.
As an affiliate, we earn on qualifying purchases.
Assess and Clean Your Surface for Better Adherence

Before you start painting, it’s crucial to assess and clean the surface thoroughly. Check the surface texture—rough, smooth, or uneven—and determine if any repairs are needed. A rough surface can trap air and cause poor paint adhesion, while a smooth surface benefits from cleaning to remove oils and dirt. Clean the surface with a mild detergent or a degreaser to eliminate grease, dust, and residues that can prevent paint from sticking properly. Using the correct cleaning tools can make a significant difference in achieving a thorough clean. Sand any glossy or slick areas to create a better grip for the paint. Removing contaminants and smoothing out imperfections ensure better adhesion, resulting in a more durable, flawless finish. Taking the time to assess and clean your surface sets a solid foundation for professional-looking results. Additionally, understanding surface preparation techniques can help ensure your paint adheres properly and lasts longer. Proper surface prep with the right tools, such as an airless paint sprayer, can make the process more efficient and effective. For optimal results, consider proper surface cleaning methods to remove stubborn residues and contaminants. Paying attention to surface porosity and texture can also influence your choice of cleaning and prep methods for the best outcome.

Romeda 8-Pack Sanding Sponge, Four Grits Per Pack 60/80/120/220, Washable and Reusable Handmade Sandpaper Block, Drywall Sandpaper Blocks for Wooden Drywall Sheetrock and Metal Glazing
【ASSORTED GRIT SANDING BLOCKS】 8 sand blocks, 4 sizes from coarse to ultra-fine sand, 60/80/120/220 grit, 2 blocks…
As an affiliate, we earn on qualifying purchases.
As an affiliate, we earn on qualifying purchases.
Mask and Protect Your Space Before You Start
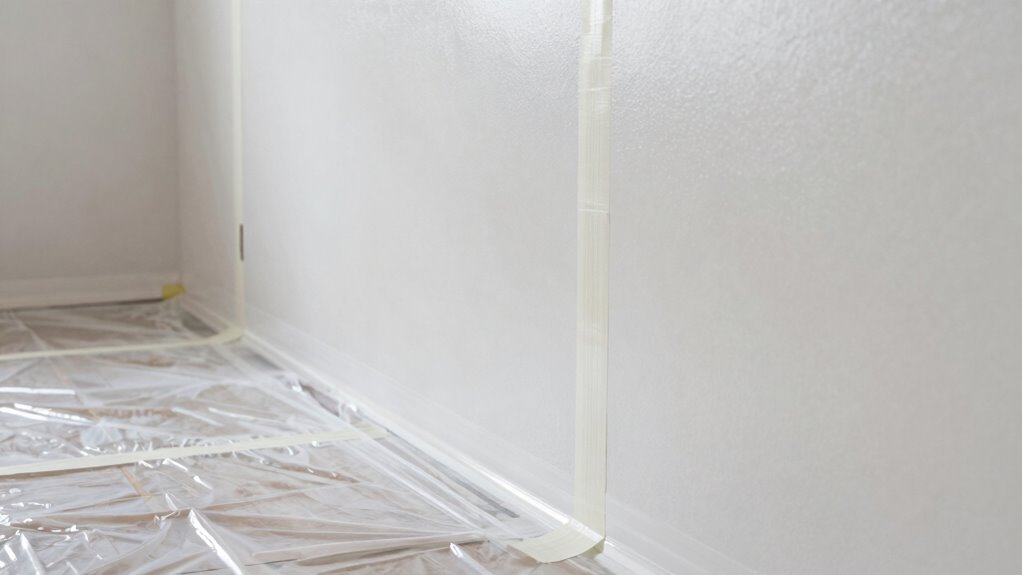
Once you’ve cleaned and prepared your surface, it’s time to protect the surrounding areas. Start by laying down drop cloths to catch any drips or spills, especially on floors and furniture. Use masking tape to carefully cover edges, trim, and fixtures you don’t want to paint. Press the tape down firmly to prevent paint bleed, ensuring clean lines. For surfaces like windows or door handles, consider removing hardware or taping around them for a neat finish. Protecting your space minimizes cleanup and helps achieve a professional look. Taking the time to mask and protect all surrounding surfaces ensures a smooth and flawless final result. Proper masking and covering are essential steps that set the stage for a flawless paint job and a smooth finished surface. Additionally, using high-quality masking tape can make a significant difference in preventing paint bleed and ensuring sharp edges. Paying attention to surface preparation can also improve the durability of your paint and overall finish. Incorporating innovative tools like connected painting devices can further enhance precision and efficiency during your project.

4 Rolls Premium Painters Tape, Blue Tape, Masking Tape, Paint Tape for Multi-Purpose, Painting, Painter's, DIY Crafts Arts (88yd =0.94IN*22yd*4) Decoration Labeling No Residue, Easy Removal
Professional Mask Tape – Multi-Surface adhesive tape made of high quality blue crepe paper not easy to lift…
As an affiliate, we earn on qualifying purchases.
As an affiliate, we earn on qualifying purchases.
Choose the Right Primer to Suit Your Surface

Choosing the right primer is essential for guaranteeing your paint adheres properly and lasts longer. When it comes to primer selection, understanding your surface’s needs is key. Different surfaces require specific primers to ensure ideal surface compatibility. For example, porous surfaces like drywall benefit from a penetrating primer that seals the material, while glossy surfaces may need a bonding primer to improve adhesion. If you’re working with metal or stained surfaces, choose a primer designed to prevent rust or cover stains. Using the correct primer not only enhances durability but also provides a smooth base for your paint. Take the time to identify your surface type and select a primer formulated for that material to achieve a professional, long-lasting finish. Additionally, selecting the appropriate primer can improve overall paint performance and reduce the need for touch-ups later. Proper surface preparation, including surface cleaning and sanding, is also crucial to ensure the primer bonds effectively and provides the best possible foundation for your paint. Being aware of primer types helps in making the right choice for different projects, ultimately saving time and effort. Understanding thermal behavior of surfaces can also guide you in choosing primers that accommodate temperature fluctuations. Incorporating the correct primer application techniques can further ensure a seamless and durable finish.
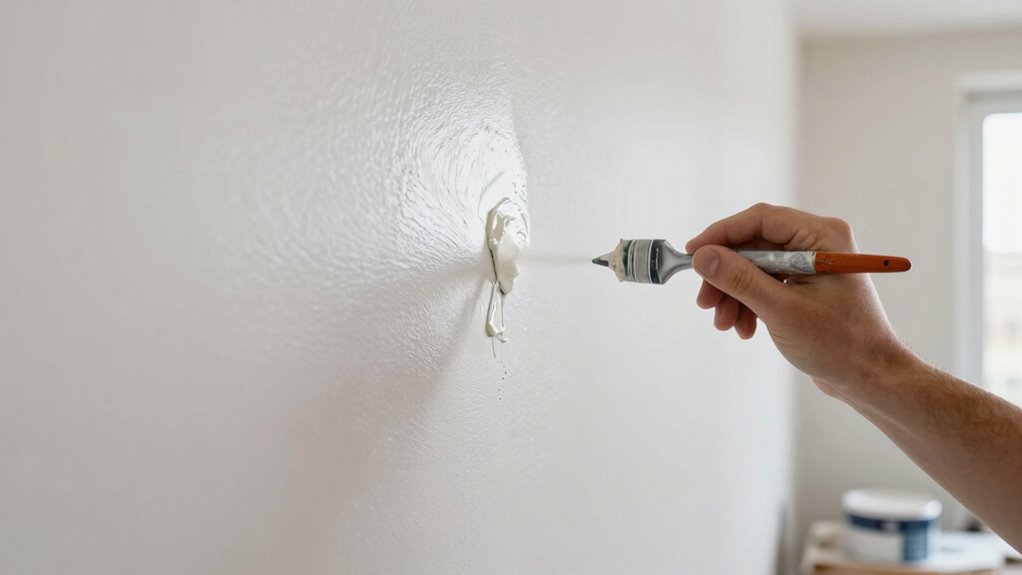
Sand and Smooth Your Surface for a Perfect Base

To achieve a flawless paint job, you need to sand and smooth your surface thoroughly. Start with texture sanding to remove any rough spots, bumps,, or old paint drips. This step helps create an even, uniform surface that’s ready to accept primer and paint. Focus on surface smoothing by using the right grit sandpaper—coarser grit for initial shaping and finer grit for finishing. Be sure to sand in a consistent, circular motion, applying gentle pressure. This process eliminates imperfections and creates a slightly dull surface, which improves paint adhesion. After sanding, wipe down the surface with a damp cloth to remove dust. Proper surface smoothing ensures your paint will go on evenly and result in a professional-looking finish. Choosing the right grit sandpaper is essential for efficient surface preparation. Additionally, understanding auditory processing can help in selecting the appropriate techniques for surface finishing, ensuring no detail is overlooked. Incorporating attention to detail during sanding can significantly enhance the final appearance of your paint job. Being mindful of visual cues can also help you identify areas needing extra sanding or smoothing for a truly seamless result.
Keep Your Workspace Dust-Free for a Clean Finish

After sanding and smoothing your surface, the next step is to keep your workspace dust-free. Dust control is essential to prevent particles from settling on your freshly prepared surface, which can ruin your finish. Start by organizing your workspace to minimize clutter and sources of dust. Cover nearby furniture and floors with drop cloths, and seal vents or open windows to avoid airborne dust. Keep tools and supplies in closed containers when not in use. Regularly wipe down surfaces with a damp cloth to capture dust before it settles. Maintaining good workspace organization helps you work efficiently and prevents dust from contaminating your project. Implementing digital resources such as project management apps can help you stay on top of your workflow and ensure all dust control measures are followed. Staying vigilant about dust control and understanding proper surface preparation techniques ensures a clean, smooth finish and professional-looking results.
Apply Primer and Paint Evenly for Professional Results
Applying primer and paint evenly is key to achieving a professional look. You need to focus on surface preparation and use a consistent technique to avoid streaks and uneven coverage. When you pay attention to these points, your finished project will look smooth and polished.
Surface Preparation Matters
Ensuring your surface is properly prepared is key to achieving a smooth, professional finish. When you start with a clean, smooth surface, your primer and paint will apply evenly, improving color matching and enhancing paint durability. Proper preparation removes dust, grease, and old paint, preventing uneven absorption or peeling later. Sanding rough patches creates a uniform surface, while filling cracks ensures a seamless look. Use a high-quality primer suited for your surface to maximize adhesion and color consistency. Remember, the better your surface prep, the more vibrant and durable your final coat will be. Don’t rush this step; it sets the foundation for a flawless paint job that lasts.
- Remove dust, grease, and loose paint
- Sand rough areas for smoothness
- Fill cracks and holes thoroughly
- Use the right primer for your surface
- Ensure complete dryness before painting
Consistent Application Technique
To achieve a smooth, professional finish, it’s essential to apply primer and paint evenly across your surface. Use consistent brush strokes and roller techniques to prevent streaks and lap marks. When using a brush, work in long, smooth strokes, maintaining even pressure to distribute paint uniformly. For rollers, apply paint in a “W” or “M” pattern, then fill in the gaps with even, overlapping strokes. Avoid pressing too hard or going over areas multiple times, as this can cause uneven texture. Keep a steady hand and maintain a wet edge to prevent visible lines. Regularly reload your brush or roller to ensure consistent coverage. Following these application techniques results in a flawless, professional-looking finish that lasts.
Common Problems During Painting and How to Avoid Them

Painting can seem straightforward, but common problems often arise if you’re not careful. Surface imperfections like bumps or cracks can show through your finish, and poor paint adhesion can cause peeling or flaking. To avoid these issues, proper surface preparation is essential.
Proper surface prep prevents paint issues like peeling and visible flaws.
- Skipping thorough cleaning can trap dirt, affecting adhesion
- Not sanding or smoothing surfaces may lead to visible imperfections
- Applying paint in high humidity can cause blistering or uneven drying
- Using incompatible paints can weaken adhesion and durability
- Neglecting primer application might result in inconsistent color and surface flaws
Final Tips to Prepare for a Long-Lasting Paint Job

A well-prepared surface sets the foundation for a durable, long-lasting paint job. To guarantee paint durability, choose the right color that complements your space and withstands sunlight or moisture exposure. Proper color selection can also prevent fading over time. Before painting, clean and sand the surface thoroughly, removing dust and grease. Applying a high-quality primer enhances adhesion and helps maintain color vibrancy. Consider the environment—if you’re painting outdoors, opt for weather-resistant paints designed for durability. Always follow manufacturer instructions for drying times and application methods. Taking these final steps ensures your paint sticks well, resists peeling, and maintains its appearance longer. With attention to color choice and surface prep, your finished project will look great and last for years.
Frequently Asked Questions
How Do I Identify the Best Primer for Different Surfaces?
To identify the best primer for different surfaces, focus on primer selection and surface compatibility. Check the label for recommendations specific to materials like wood, metal, or drywall. Consider the existing surface condition—porous, stained, or glossy surfaces need specialized primers. Test a small area first to verify it adheres well and provides proper coverage. By matching the primer to your surface, you’ll achieve a smooth, durable finish.
What Tools Are Ideal for Achieving a Smooth Paint Finish?
To achieve a smooth paint finish, choose the right tools based on your project. Use a high-quality brush suited for your paint type for detailed areas, ensuring even coverage. For large surfaces, opt for a roller with the appropriate nap length—short nap for smooth walls, longer nap for textured surfaces. Combine these tools with proper technique, like maintaining a wet edge, to prevent streaks and achieve a flawless, professional look.
How Do I Fix Paint Drips or Uneven Areas During Application?
Think of fixing paint drips like smoothing out a rough sea. You should immediately use a damp brush to gently feather the uneven area, blending it seamlessly. Keep your paint consistent by stirring thoroughly and avoiding overloading your brush. Use brush techniques such as light, even strokes, to level out drips or uneven patches. Act quickly before the paint dries, ensuring a flawless, professional finish that’s smooth and even.
What Are the Safest Methods for Ventilating During Painting?
You should prioritize proper mask selection to protect yourself from fumes and guarantee safe breathing. Use air circulation techniques like opening windows, adding fans, and creating cross-ventilation to improve airflow. Keep doors and windows open whenever possible, and position fans to direct fumes outside. These methods help maintain a safe environment during painting, reducing inhalation risks and ensuring your workspace remains well-ventilated throughout the project.
How Often Should I Clean Brushes and Rollers During a Project?
You should clean your brushes and rollers regularly during your painting project to maintain ideal brush maintenance and roller care. Rinse brushes with warm water or solvent after every few hours of use, especially when switching colors or paints. For rollers, wash thoroughly when changing shades or when they become visibly dirty. Proper cleaning prevents dried paint buildup, ensures smooth application, and prolongs the life of your tools.
Conclusion
By following these prep secrets, you set yourself up for a flawless finish. Imagine prepping a kitchen wall—cleaning, sanding, and priming properly prevents peeling and uneven color. When you take your time to prepare, your paint job lasts longer and looks professional. So, don’t skip the prep step; it’s the key to stunning results that stand the test of time. Proper prep truly makes all the difference in achieving the perfect finish.