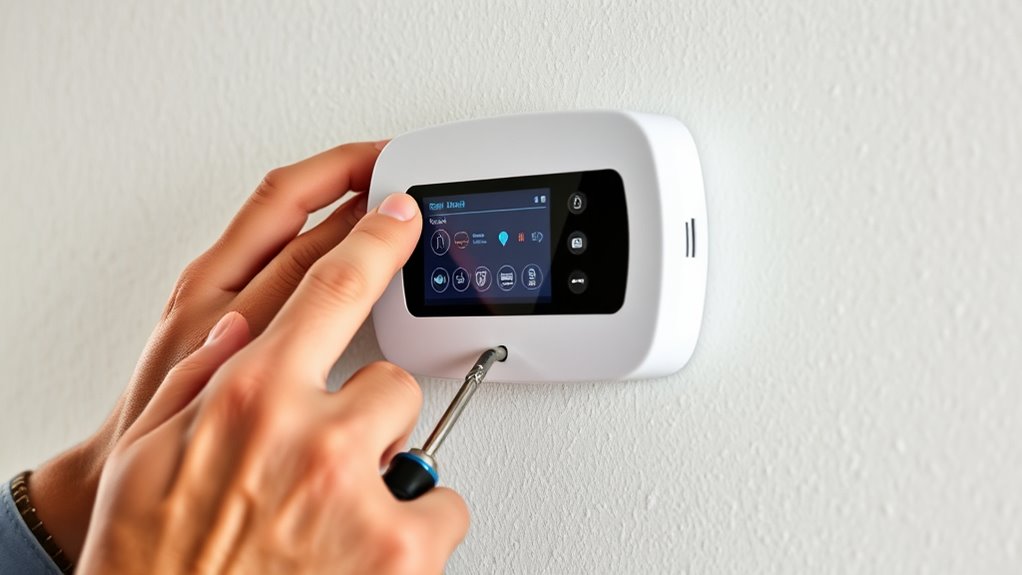

To install a programmable thermostat, start by turning off power to your HVAC system to guarantee safety. Remove the old thermostat carefully, noting or photographing wire connections for reference. Connect the wires to the new thermostat’s corresponding terminals, making sure everything is secure. Mount the device at eye level, then configure the settings and schedules. Test the system to confirm proper operation. Keep going to find more detailed tips for a smooth upgrade.
Key Takeaways
- Turn off power at the main electrical panel to ensure safety before removal and installation.
- Remove the old thermostat carefully, noting or photographing wiring connections for reference.
- Connect the new thermostat’s wires securely according to color codes and terminal labels.
- Mount the thermostat on the wall at an accessible height, ensuring it is level and secure.
- Configure temperature settings, set schedules, and test smart features for optimal system performance.
Preparing Your Workspace and Gathering Tools

Before you begin installing your programmable thermostat, it’s important to prepare your workspace and gather all necessary tools. Start with a tools overview—basic items like a screwdriver, wire strippers, a level, and possibly a drill. Organize your workspace setup by clearing the area around your existing thermostat to give yourself easy access. Make sure your workspace is well-lit and free of clutter to work efficiently and safely. Having everything within reach prevents unnecessary interruptions and helps you stay focused. Double-check that you have all the tools needed before starting. Proper preparation guarantees a smooth installation process, minimizes mistakes, and saves time. Taking these initial steps sets a solid foundation for a successful thermostat upgrade. Additionally, understanding your power requirements can help ensure compatibility and safety during installation.
Turning Off Power to Your HVAC System

Turning off the power to your HVAC system is a crucial safety step before installing a programmable thermostat. To prevent electrical shock or damage, always follow safety precautions by turning off the circuit breaker that supplies power to your system. Locate your home’s main electrical panel and switch off the breaker labeled for your HVAC unit. This cuts off power to all electrical wiring connected to the system, ensuring a safe working environment. Confirm the power is off by trying to operate the system or using a voltage tester. Taking this step protects you from potential electrical hazards and helps avoid damaging the existing wiring during installation. Always double-check that power is completely off before proceeding with any work. Signs of spoilage in lemon juice highlight the importance of handling electrical components safely to prevent hazards.
Removing the Old Thermostat

To remove the old thermostat, start by carefully taking off its faceplate or cover. Once removed, you’ll see the wires connected to the old thermostat. Before touching anything, double-check that the power is off to avoid electrical shock. Gently loosen or disconnect the wire terminals, making note of where each wire was attached, or take a picture for reference. Carefully pull out the old thermostat from the wall, ensuring no wires are snagged or damaged. If wires are connected with screws, loosen them carefully. Keep the wires organized to prevent confusion during installation of the new thermostat. Removing the old thermostat is straightforward, but taking your time ensures you don’t accidentally damage the wiring or wall. Additionally, understanding the electrical wiring involved can help prevent mistakes during removal and installation.
Connecting the Wires to the New Thermostat

Connecting the wires to your new thermostat requires careful attention to detail. First, consult the wire color codes and terminal labels to identify each wire’s function. This guarantees you connect each wire correctly, preventing damage or malfunction. Keep a note of the existing wiring before disconnecting the old thermostat, so you can match everything properly. Referencing the best-rated pinball machines of 2024 can give you an idea of how meticulous setup ensures optimal performance.
Here are some tips to make the process smoother:
- Match wire colors to the corresponding terminal labels on the new thermostat.
- Use a screwdriver to securely attach each wire, avoiding loose connections.
- Double-check all connections before powering the system back on.
Taking your time during this step guarantees a safe and proper setup, setting you up for smooth thermostat operation.
Mounting and Configuring the Programmable Thermostat

First, you’ll need to choose the best spot on the wall to mount your thermostat, making sure it’s away from drafts and direct sunlight. Once you’ve secured the device properly, you can start configuring the temperature settings to suit your schedule. Proper placement and setup guarantee your thermostat functions efficiently and keeps your home comfortable. Additionally, understanding city dynamics can help you optimize your home’s climate control for energy savings.
Choosing Mounting Location
Choosing the right mounting location for your programmable thermostat is essential to guarantee accurate temperature readings and reliable operation. Proper wall placement ensures the thermostat isn’t affected by external factors like sunlight interference or drafts. Avoid mounting it near windows, vents, or direct sunlight, which can skew readings and cause unnecessary heating or cooling cycles. You want a spot that reflects the average room temperature. Additionally, place it at eye level for easy access and adjustments. Remember, a poor location can compromise your thermostat’s accuracy and energy savings. Keep these tips in mind:
- Choose a wall away from direct sunlight and drafts
- Mount at eye level for easy operation
- Avoid placing near heat sources or vents
- Ensure the thermostat is placed in a location that minimizes false readings caused by external influences to maximize energy efficiency.
Securing the Device Properly
To guarantee your programmable thermostat functions correctly, it’s important to securely mount and properly configure the device. Focus on mounting security by ensuring the thermostat is firmly attached to the wall, using appropriate anchors if necessary. This prevents accidental falls or shifting that could disrupt operation. Pay close attention to wiring safety: turn off power before connecting wires, and double-check that each wire is attached to the correct terminal to avoid short circuits or damage. Secure the wiring neatly to prevent loose connections or interference. Proper mounting and wiring safety not only protect your device but also ensure reliable performance. Take your time during installation, and don’t rush, so your thermostat stays secure and functions efficiently over time.
Configuring Temperature Settings
Once your thermostat is securely mounted, the next step is to configure the temperature settings to match your comfort preferences. Using the user interface, you can easily set your desired temperatures for different times of the day and week. Familiarize yourself with the programming options to customize schedules that suit your routine. This process allows you to optimize energy efficiency while maintaining comfort. Here are some tips to make this easier:
- Use the touch screen or buttons to navigate the programming menu smoothly
- Set different temperature levels for weekdays and weekends
- Take advantage of pre-set schedules or create your own for maximum flexibility
- Understanding programming options can help you tailor your thermostat to your lifestyle.
Testing and Finalizing the Installation

Now that you’ve installed your thermostat, it’s time to test that it works properly. Turn it on and verify that it controls your heating and cooling systems as expected. Then, fine-tune the settings to maximize efficiency and comfort. If you notice any issues with your system’s response, consider consulting tuning options to optimize performance further.
Verify Thermostat Functionality
Before finalizing the installation, it is essential to verify that your new thermostat functions correctly. Start by checking sensor calibration to guarantee accurate temperature readings. Confirm compatibility verification with your HVAC system to prevent issues down the line. To do this, you can: – Test the thermostat’s response by setting different temperatures and observing if the system activates properly. – Use the thermostat’s display to verify sensor calibration, ensuring it matches actual room temperature. – Double-check all wiring connections for secure contact and correct setup. Additionally, consulting smart features can help ensure your thermostat integrates seamlessly with your home automation system.
Adjust Settings for Efficiency
To guarantee your thermostat operates efficiently, you should fine-tune its settings after confirming proper installation. Adjust the temperature schedules to align with your daily routines, maximizing energy savings. Set your thermostat to lower the heat or cooling when you’re away or asleep, then program it to ramp up before you return or wake up. Use the scheduling optimization feature to create consistent, tailored routines that reduce unnecessary energy use. Be sure to test different settings over a few days to find the most efficient balance between comfort and savings. Keep an eye on your utility bills to gauge improvements. Small adjustments can lead to significant energy savings, making your programmable thermostat a valuable tool for both comfort and cost efficiency. Additionally, understanding efficiency of hydrogen fuel cells can provide insights into sustainable energy solutions that complement energy management in smart homes.
Frequently Asked Questions
Can I Install a Programmable Thermostat Myself Without Professional Help?
You can definitely try DIY installation if you’re comfortable working with wiring, but be cautious. Before starting, review the thermostat’s troubleshooting display to understand its functions and potential issues. Turn off power to your HVAC system, follow instructions carefully, and double-check connections. If you encounter any problems or uncertainties, it’s best to consult a professional to prevent damage or safety hazards. Safety always comes first.
Which Compatible Thermostats Work With My Existing HVAC System?
When choosing a compatible thermostat, you need to consider your HVAC compatibility and thermostat wiring. Check your system’s specifications to ensure the thermostat matches your heating and cooling setup. Look for models that support your wiring type, whether it’s C-wire or a different configuration. Popular options like Nest, Ecobee, and Honeywell are often compatible, but always verify their compatibility with your specific HVAC system before installation.
How Do I Program the New Thermostat for Energy Efficiency?
To program your new thermostat for energy efficiency, start by setting energy saving settings during periods when you’re typically away or asleep. Use scheduling optimization to create a daily routine that minimizes heating or cooling when it’s unnecessary. Adjust temperature settings gradually for comfort and savings. Regularly review and tweak your schedule to match seasonal changes or lifestyle shifts, ensuring you maximize energy savings and maintain comfort.
What Should I Do if the Thermostat Display Is Blank After Installation?
If your thermostat display is blank, start with display troubleshooting by checking the power supply. Make certain the batteries are fresh if it’s battery-operated, or verify the unit is properly connected to the power source. Sometimes, a simple reset or turning the circuit breaker off and on can resolve power issues. If the display remains blank, you may need to consult the manufacturer’s instructions or seek professional help to diagnose further.
Are There Safety Precautions for Handling Electrical Components During Installation?
Did you know that electrical hazards cause thousands of injuries annually? When handling electrical components, always prioritize electrical safety by turning off power at the circuit breaker before starting. Use insulated tools and wear rubber gloves to prevent shocks. Carefully handle each component, avoiding damage or loose connections. Following these safety precautions helps protect you from electrical accidents and guarantees a smooth, safe installation process.
Conclusion
Now that your new thermostat is installed, you can enjoy precise comfort and energy savings. It’s satisfying to control your home’s climate effortlessly, but remember, a simple mistake could lead to discomfort or higher bills. Take pride in your DIY achievement, knowing you’ve improved your space. Sometimes, the smallest adjustments bring the greatest comfort—making your home not just smarter, but warmer, cozier, and more welcoming.