
To refinish your wooden tray for decor, start by inspecting it for scratches or damage and removing loose paint or debris with a scraper or coarse sandpaper. Sand the surface in the wood grain direction and clean thoroughly. Apply eco-friendly finishes like natural stains or sealants, then add your favorite decorative techniques, such as distressing, stenciling, or decoupage. Finish with a clear protective coat to guarantee durability and easy cleaning. Keep exploring for detailed steps to perfect your project.
Key Takeaways
- Clean and sand the tray thoroughly, following the wood grain, to remove loose paint and create a smooth surface.
- Repair any deep scratches or damage with putty filler and sand again for an even finish.
- Apply eco-friendly stain or finish to deepen color and highlight natural wood grain sustainably.
- Decorate with stenciling, distressing, or decoupage to add personalized texture and style.
- Seal with a clear, environmentally friendly topcoat to protect the surface and ensure durability.
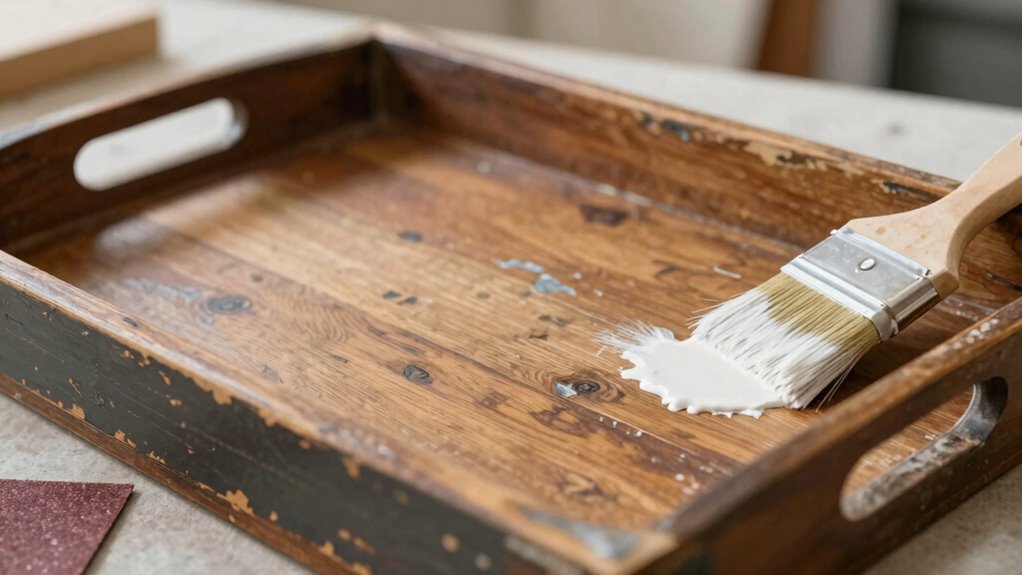
Are you tired of your old, scratched wooden tray? Restoring it for decorative use can breathe new life into its surface and turn it into a charming centerpiece. The process begins with assessing the tray’s condition. If it has deep scratches or damaged areas, you’ll want to gather some restoration tools—like sandpaper, a scraper, and maybe even a putty filler for cracks. These tools help you prepare the surface, making it smooth and ready for decorative techniques. Start by removing any loose paint, varnish, or debris with a scraper or a coarse-grit sandpaper. Be sure to sand in the direction of the wood grain to prevent scratches and ensure a more even finish. Incorporating biodiversity principles can also inspire eco-friendly restoration choices, such as using natural or sustainable finishes. Using environmentally friendly products can also contribute to a more sustainable restoration process, which benefits both your project and the environment.
Once the surface is clean and smooth, you can explore a variety of decorative techniques. If you’re aiming for a rustic look, a light distressing with sandpaper can highlight the natural wood grain and add character. For a more polished appearance, you might consider staining the tray to deepen its color, followed by a clear protective finish. If you want to add pattern or texture, stenciling or decoupage can be excellent options. Use stencils with stencil brushes or sponges to create intricate designs, or apply decorative paper with a decoupage medium for a vintage vibe. These techniques allow you to customize the tray to match your decor style. Additionally, exploring eco-friendly finishes can help ensure your project aligns with sustainable practices.
Explore techniques like distressing, staining, stenciling, or decoupage to personalize and enhance your tray’s look.
After completing your decorative work, it’s essential to seal and protect the surface. Apply a clear coat of polyurethane, lacquer, or a water-based sealant to guard against moisture and scratches. Use a brush or spray depending on the type of finish you choose, and make sure to follow the manufacturer’s instructions for drying times. This final step ensures your beautiful refinished tray remains durable and easy to clean, making it perfect for display or serving.
Throughout the entire process, patience and attention to detail are key. Proper preparation using the right restoration tools will make your decorative techniques more effective and give you a professional-looking result. As you work, stay focused on your design vision, and don’t be afraid to experiment with colors, patterns, or textures. When you’re finished, your once-old, scratched tray will transform into a stylish, functional decor piece that adds charm and personality to your space.

Wooden Paint Palette for Oil Painting, 3 PCS Oval Paint Tray Palettes for Acrylic Paint, Watercolor Paint Palette for Artist, Art Palette
- Set Includes Three Palettes: Three high-quality oval palettes included
- Premium Wooden Material: Made from durable, non-toxic wood
- Ergonomic Design: Comfortable grip with oval thumb hole
As an affiliate, we earn on qualifying purchases.
As an affiliate, we earn on qualifying purchases.
Frequently Asked Questions
How Long Does the Refinishing Process Typically Take?
Refinishing a wooden tray usually takes about a day or two, depending on your cleaning methods and drying times. You’ll start by cleaning the tray thoroughly, then choose a suitable paint, considering its durability and finish. After applying the paint, allow enough drying time before adding a protective coat. Patience with these steps guarantees a smooth, long-lasting finish that transforms your tray into a lovely decor piece.
Can I Use Non-Toxic or Eco-Friendly Finishes?
Yes, you can definitely use non-toxic sealants and eco-friendly paints when refinishing your wooden tray. These products are safe, environmentally friendly, and free from harmful chemicals, making them perfect for decor projects, especially if you have kids or pets. Look for labels that specify non-toxic or eco-friendly, and choose finishes that provide durability and a beautiful appearance while keeping your space healthy.
What Tools Are Essential for Refinishing a Tray?
Think of refinishing as painting your tray’s story. You’ll need crucial tools like sandpaper, a brush or roller, and a tack cloth for a smooth finish. These tools help you explore color options and guarantee finish durability. A good-quality painter’s tape and a protective sealant are essential, too. With these in hand, you’ll craft a tray that’s both beautiful and enduring, ready to tell its new tale.
How Do I Prevent Future Damage After Refinishing?
To prevent future damage, you should regularly clean your tray with gentle cleaning techniques, avoiding harsh chemicals that can harm the finish. Use soft cloths and mild cleaners to keep it looking fresh. Store your tray in a dry, protected area, preferably with storage solutions like felt pads or liners to prevent scratches and moisture buildup. These steps help maintain the refinished surface and prolong its decorative appeal.
Is It Necessary to Sand the Tray Before Refinishing?
Yes, you should sand the tray before refinishing. Proper wood preparation involves sanding to guarantee surface smoothing, which helps remove any existing finish, splinters, or rough spots. This step creates a clean, even surface that allows paint or stain to adhere better, resulting in a professional-looking finish. Skipping sanding can lead to uneven coverage and reduced durability, so take your time to sand thoroughly for the best refinishing results.
Conclusion
Now that you’ve learned how to breathe new life into your wooden tray, you’re all set to turn it into a stunning decor piece. With a little effort, you can elevate a simple item into a charming focal point in your home. Remember, patience pays off, and sometimes, a fresh coat of paint is just what the doctor ordered. So go ahead—dust off those supplies and let your creativity run wild. Your beautiful new decor awaits!