
To create a stunning macramé wall hanging in one afternoon, start by gathering quality cords in colors that match your space and set up your workspace with good lighting and all your tools within reach. Choose a simple yet appealing design and prepare your yarn and support rod. Master basic knotting techniques, add decorative elements like beads or fringes, and finish with neat trims. Keep experimenting and organizing as you go—if you continue, you’ll discover even more tips to perfect your piece.
Key Takeaways
- Choose a simple, eye-catching design style and size suited for quick execution, like minimalist or small vintage patterns.
- Prepare high-quality, color-coordinated cords and organize your tools and materials for efficient knotting.
- Set up a well-lit, comfortable workspace near natural light with all tools within easy reach.
- Master basic knot techniques and focus on consistent tension to speed up pattern formation.
- Incorporate decorative elements and trim at the end for a polished, stunning finish in just one afternoon.
Gathering Your Materials and Tools

Before you begin your macramé wall hanging, gather all the necessary materials and tools. Start with quality cords, choosing color combinations that complement your space; neutral tones create a calming vibe, while bold hues add energy. Understanding the historical origins of macramé, which dates back to 13th-century Arab weavers, can inspire your design choices. Select scissors, a measuring tape, and a sturdy dowel or branch as your base. Having a variety of knotting tools like clips or pins can make the process smoother. Keep in mind that the right materials affect both the appearance and durability of your piece. Additionally, incorporating sound healing science principles such as mindful knotting can enhance your crafting experience. Once everything’s ready, you’ll be set to start creating your beautiful, personalized wall hanging that reflects your style and appreciation for this ancient craft.
Choosing the Perfect Design and Size

Choosing the perfect design and size for your macramé wall hanging is a crucial step that sets the tone for your space. Think about your room’s color palettes and the mood you want to create. Whether you prefer a minimalist style or something more intricate, your design inspiration guides your choices. To visualize, consider this table:
| Design Style | Size Recommendation | Color Palette |
|---|---|---|
| Bohemian | Large, 24-36 inches | Earth tones, neutrals |
| Modern | Medium, 18-24 inches | Monochrome, bold accents |
| Vintage | Small, 12-18 inches | Soft pastels |
| Nature-inspired | Varies, 20-30 inches | Greens, browns |
| Abstract | Any, custom size | Bright, contrasting |
Match your design and size to your space and personal taste for a stunning result. Additionally, consider proportional balance to ensure your wall hanging complements your other decor elements harmoniously.
Cutting and Preparing Your Yarn

Start by choosing yarns that suit your project’s style and strength needs. Measure and cut your lengths carefully to match your design, then organize them so everything’s ready for assembly. Proper preparation makes creating your wall hanging easier and more enjoyable. Incorporating yoga accessories such as clips or hooks can help keep your yarns in place during assembly, ensuring a cleaner and more precise final piece.
Selecting Suitable Yarn
When selecting your yarn, focus on choosing materials that suit your design and guarantee easy handling. Fiber selection is key; opt for soft, manageable fibers like cotton or wool, which knot smoothly and hold their shape. Consider how the yarn’s texture and thickness will influence your finished piece. Color coordination also matters—pick hues that complement each other and match your space’s aesthetic. Mixing different shades can add visual interest, but keep a cohesive palette in mind. Avoid overly slippery or bulky fibers that may complicate your project. Gather a variety of suitable yarns that work well together, ensuring each strand is clean and free of tangles. Proper Fiber selection at this stage makes your macramé process smoother and results in a polished, stunning wall hanging.
Measuring and Cutting Lengths
How do you guarantee your yarn is the right length for your project? Start with measuring accuracy—use a flexible tape measure or ruler for precise lengths. Cut your yarn with sharp cutting tools, like scissors or rotary cutters, to ensure clean edges. To visualize, imagine:
| Yarn Length | Cutting Tool | Purpose |
|---|---|---|
| 2 ft | Scissors | Shorter strands |
| 4 ft | Rotary Cutter | Mid-length strands |
| 6 ft | Sharp Scissors | Longer strands |
These measurements set the foundation for your wall hanging. Be consistent to make your knots uniform. Proper measuring and sharp tools help prevent fraying and uneven cuts, ensuring your project looks polished and professional. Additionally, understanding glycolic acid benefits can help improve your skin’s appearance after crafting your wall hanging.
Organizing for Assembly
Before assembling your wall hanging, organize your cut yarns to streamline the process. Arrange your yarns by color palettes to create visual harmony and make knot variations easier to identify. This step helps prevent tangling and saves time during assembly. For those interested in customizing their design, understanding tuning options can inspire unique aesthetic modifications. Consider these key steps:
- Group yarns by color to enhance overall design cohesion.
- Lay out different lengths for various knot styles, ensuring smooth progression.
- Keep your knot variations accessible to experiment during assembly.
- Use labeled containers or clips to maintain order and avoid confusion.
Setting Up Your Workspace for Knotting
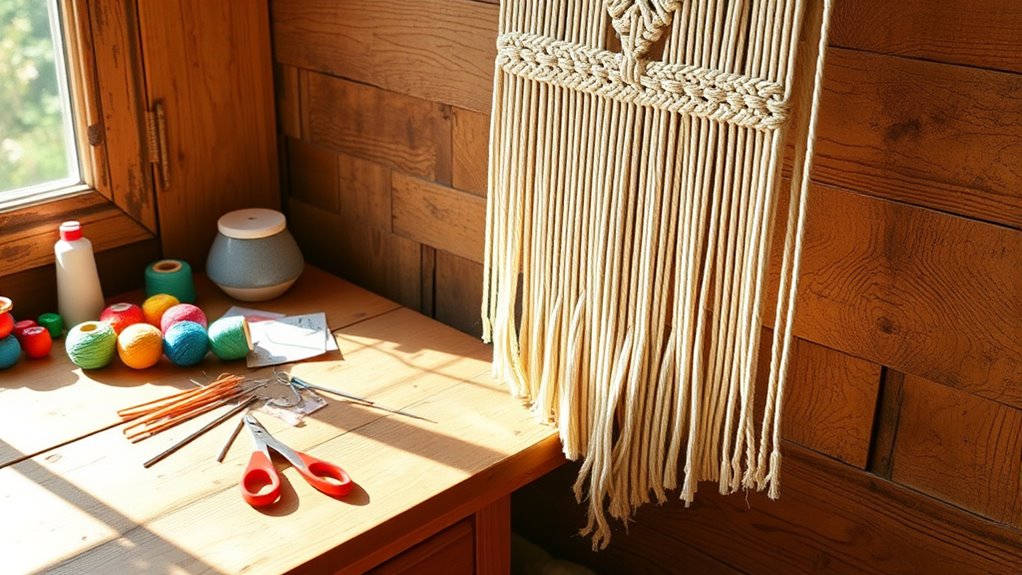
Start by organizing all your tools within easy reach so you won’t waste time searching. Choose a comfortable spot with good lighting and enough space to work freely. A tidy, well-lit area makes knotting easier and more enjoyable. Ensuring proper workspace lighting helps you see your knots clearly and reduces eye strain.
Organizing Your Tools
Creating an organized workspace is essential for a smooth knotting process. When your tools are well-arranged, you can focus on designing your wall hanging without unnecessary interruptions. Start by gathering your best scissors, measuring tape, and a variety of cords in complementary color combinations. Keep these within easy reach to streamline your workflow. Consider wall placement for your finished piece, ensuring it’s visible and inspiring. To deepen your understanding, keep these in mind:
- Arrange tools by frequency of use to save time.
- Use labeled containers for different cord types and colors.
- Designate a spot for your reference sketches or color palettes.
- Position your workspace near good lighting to see details clearly.
- Understanding residency requirements can help you plan your project timeline effectively.
A tidy setup allows creativity to flow effortlessly.
Choosing a Comfortable Spot
Choosing a comfortable spot for knotting is essential to enjoy the process and produce your best work. Find a cozy corner in your home where you can sit undisturbed. Position yourself near a bright window to guarantee good lighting, which makes it easier to see your cords and details. Make sure your workspace is stable and at a comfortable height to prevent strain. Keep your tools and materials within arm’s reach so you stay focused on your knotting. A relaxed environment helps you stay patient and precise, turning the creative process into a satisfying experience. Whether it’s a nook in your living room or a quiet spot in your studio, setting up in a cozy corner with natural light makes all the difference. Additionally, creating a comfortable workspace can enhance your overall experience and results.
Creating the Top Header With a Lark’S Head Knot

To secure your macramé wall hanging to its support rod, you’ll need to learn how to make a lark’s head knot. This knot creates a sturdy, even top header while helping prevent tangles. Start by folding your cord in half, then loop it over the rod. Pull the loose ends through the loop, tightening gently. As you work, consider these points:
- Proper tension prevents tangles and keeps knots uniform.
- Use consistent cord lengths for a clean look.
- Coordinate colors to enhance visual harmony.
- Secure each knot tightly to maintain the structure.
- Ensuring correct knot placement can also improve the overall stability of your wall hanging.
Mastering the lark’s head knot ensures your wall hanging hangs securely and looks professional. Focus on tension and color coordination to make your project both durable and aesthetically pleasing.
Forming the Pattern With Square and Half Hitch Knots
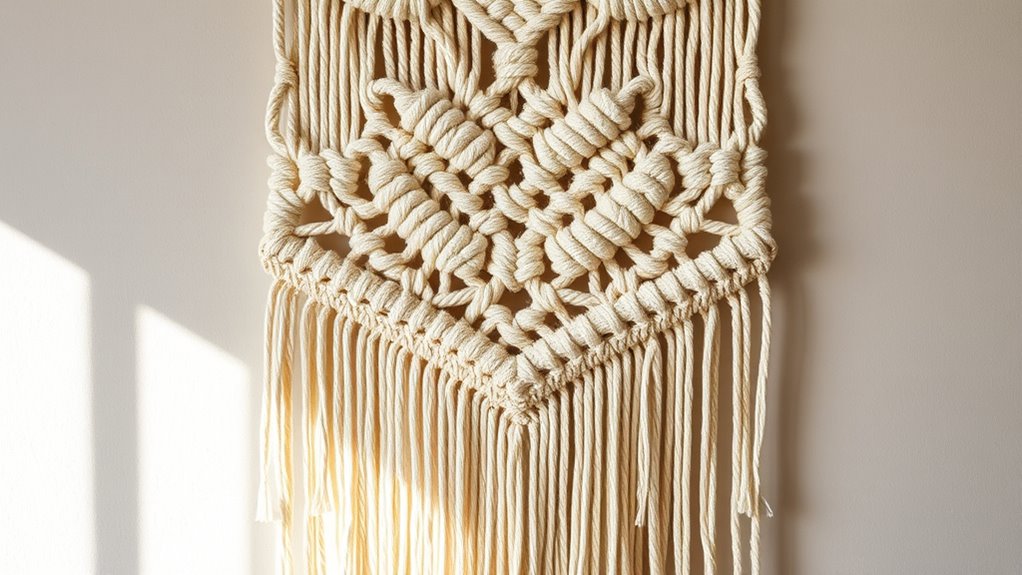
Now, you’ll learn how to form patterns using square and half hitch knots, which are essential for creating structure. Mastering these basic techniques helps you build symmetrical designs and gives your wall hanging a polished look. Remember to adjust knot tension as you go to keep your pattern even and neat.
Basic Knot Techniques
Mastering basic knot techniques is essential for creating a sturdy and attractive macramé wall hanging. Using square and half hitch knots, you can develop diverse patterns with knot variations that add texture and depth. These knots serve as the foundation for your design, allowing you to experiment with different styles and color palettes. As you practice, focus on consistency to guarantee your pattern remains even and professional-looking. Remember, the choice of knot placement influences the overall aesthetic, so plan your design carefully. Here are four insights to guide you:
- Consistent tension creates uniformity.
- Experiment with knot variations for unique textures.
- Color palettes can highlight pattern details.
- Mastering these knots offers endless creative possibilities.
Creating Symmetrical Patterns
Building symmetrical patterns in your macramé wall hanging starts with careful knot placement and consistent technique. Use square and half hitch knots to create balanced sections, ensuring each knot aligns precisely. Incorporate color blending by choosing threads that complement or gradually transition, enhancing the pattern’s visual flow. The contrast in texture adds depth; thicker cords can be paired with smoother ones for a striking effect. Maintain uniform tension as you knot to keep symmetry intact. Repeating patterns on both sides of your design helps achieve a mirror image, reinforcing the overall balance. By paying close attention to how each knot interacts with the next, you’ll craft a harmonious, eye-catching pattern that showcases your skill in blending color and texture seamlessly.
Adjusting Knot Tension
To achieve a polished look in your macramé wall hanging, adjusting the tension of each knot is essential, especially when working with square and half hitch knots. Consistent knot tension ensures your pattern remains even, and yarn stretch doesn’t distort your design. Keep a gentle but firm grip to maintain uniformity as you work. Here are key tips:
- Check tension frequently to prevent uneven knots.
- Slightly tighten or loosen knots to correct yarn stretch.
- Keep your yarn taut but not overstretched, avoiding sagging.
- Remember that yarn stretch may loosen knots over time, so adjust proactively.
Adding Decorative Elements and Fringes
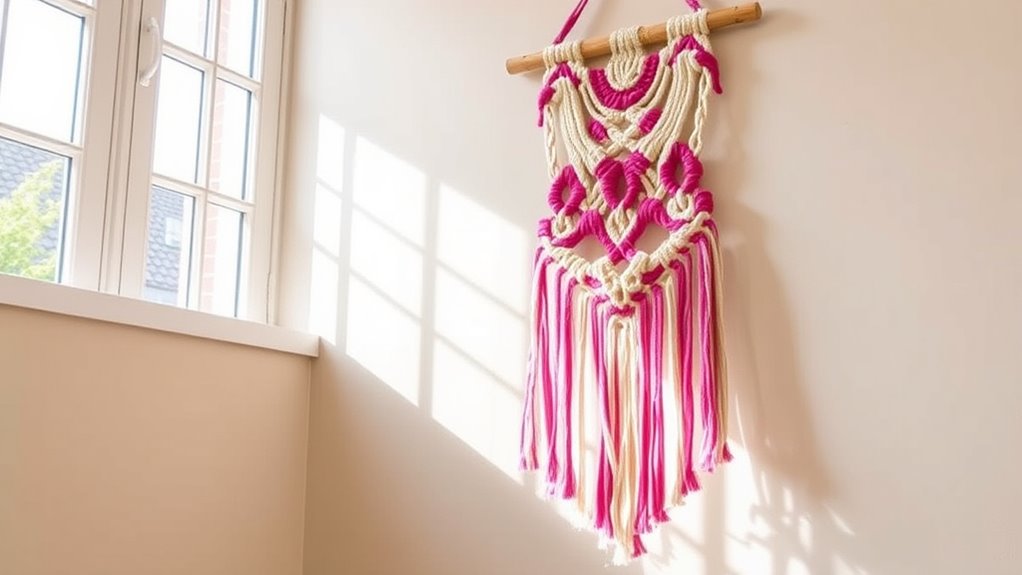
Adding decorative elements and fringes is a simple way to give your macramé wall hanging a personalized, finished look. You can incorporate decorative accents like beads, shells, or small charms into the knots or along the edges to add visual interest. Fringe embellishments are also a popular choice; you can trim the ends of your cords to create a flowy, textured border. To do this, use sharp scissors to carefully cut the cords at varying lengths, enhancing the overall design. These small touches make your piece stand out and reflect your style. Keep the embellishments balanced and avoid overcrowding, so your wall hanging maintains its sleek, polished appearance. With a few simple additions, your creation transforms from basic to beautifully unique.
Assembling and Securing the Final Section

Once you’ve completed the main design, it’s vital to assemble and secure the final section to guarantee your wall hanging stays intact. Focus on reinforcing the structure with sturdy knots, ensuring material durability. Choose a cohesive color palette that complements your space, emphasizing harmony. To secure everything properly:
- Use strong, even knots to attach the final strands, preventing slipping.
- Reinforce joints with a dab of craft glue for extra hold.
- Double-check that all strands are evenly tensioned and aligned.
- Trim excess cords neatly, maintaining the overall aesthetic and balance.
This step ensures your art remains durable and visually appealing. Proper assembly not only enhances the look but also guarantees your wall hanging withstands time and handling.
Finishing Touches and Hanging Your Art
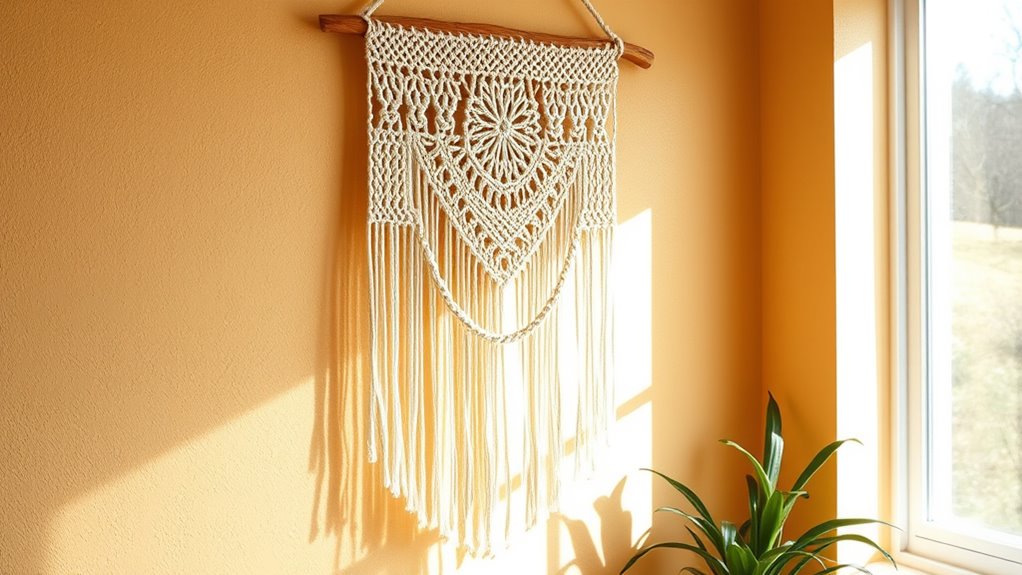
After completing your wall hanging, the next step is to give it polished finishing touches and prepare it for display. Start by inspecting your piece, ensuring all knots are tight and secure. Adjust the length of fringe or tassels to create a balanced look, trimming any uneven ends. Consider the color palettes you’ve chosen; if needed, add small accents or beads to enhance the visual appeal. When hanging, select a sturdy wall hook or rod that complements your art’s style. Use knot techniques like lark’s head or square knots to attach the piece securely, ensuring it hangs flat and centered. These finishing details will elevate your macramé’s appearance and make it ready to showcase in your space.
Tips for Maintaining and Refreshing Your Macramé Piece

To keep your macramé wall hanging looking its best, regular maintenance is essential. Proper care tips and cleaning methods help preserve its texture and color. Here are four key tips:
Regular maintenance preserves your macramé’s beauty and vibrancy.
- Gently dust your piece weekly with a soft brush or cloth to prevent dirt buildup.
- When needed, spot-clean with a damp cloth and mild detergent, avoiding soaking.
- Keep it away from direct sunlight to prevent fading over time.
- Refresh your macramé by gently shaking or using a hairdryer on a cool setting to remove dust and restore fullness.
Frequently Asked Questions
Can I Customize My Wall Hanging With Different Colors and Patterns?
Yes, you can definitely customize your wall hanging with different color schemes and pattern variations. You have the flexibility to choose colors that match your decor or personal style, and pattern variations can add unique flair. Just communicate your preferences to the artisan or craft it yourself if you’re DIY-ing. Customization allows you to create a piece that perfectly fits your space and aesthetic, making your wall hanging truly one-of-a-kind.
What Are the Best Types of Yarn for Outdoor Use?
When choosing yarn for outdoor use, you want weather-resistant fibers that withstand the elements. Look for UV-safe yarns, which resist fading from sunlight, and guarantee they’re durable enough to handle moisture and wind. These fibers keep your wall hanging vibrant and intact longer. Selecting the right outdoor yarns helps your creation stay beautiful, whether it’s hanging on a porch or in your garden.
How Long Does a Typical Macramé Wall Hanging Last?
Your macramé wall hanging’s durability lifespan depends on the materials you choose. With the right yarn, it can last decades, looking as vibrant as day one. High-quality fibers resist fading, fraying, and wear, vastly exceeding ordinary expectations. If you care for it properly, your wall art’s material longevity could outlive trends, becoming a treasured heirloom. So, invest in premium materials for a stunning, long-lasting addition to your space.
Is It Possible to Make a Hanging Without Prior Knotting Experience?
Absolutely, you can make a hanging without prior knotting skills by focusing on beginner techniques. While it might seem challenging at first, simple knotting methods like square knots are easy to learn and perfect for beginners. With patience, you’ll pick up the basics quickly. Just follow step-by-step tutorials, and you’ll create a beautiful, personalized wall hanging in no time, even if you’re new to knotting.
How Can I Safely Store My Finished Macramé Art?
Think of your macramé as a delicate butterfly, needing careful care. To protect it, use storage tips like hanging it in a fabric bag or wrapping it in a soft cloth. Keep it in a dust-free environment and avoid direct sunlight to prevent fading. This way, your art stays vibrant and safe, preserving its beauty for years to come, just like safeguarding a treasured keepsake.
Conclusion
Now that you’ve created your stunning macramé wall hanging in just one afternoon, imagine how it transforms your space. Did you know that DIY home decor projects like this can boost your mood and reduce stress? With your new skills, you can craft unique pieces anytime, adding personality and warmth to your home. Keep experimenting with different designs—your perfect wall art is just a knot away. Happy creating!