To create DIY ribbon storage and dispensers, repurpose household items like muffin tins or shallow trays for upright organization, and consider wall-mounted racks or pegboards to maximize space. Use simple materials like paper towel holders or wooden dowels mounted on walls to keep ribbons accessible and tangle-free. Label each roll for easy identification, or store in clear containers for quick visibility. If you keep exploring, you’ll discover more clever ideas to keep your ribbons neat and ready to use.
Key Takeaways
- Repurpose household items like muffin tins, cookie sheets, or shallow trays for upright ribbon storage and easy access.
- Create DIY ribbon dispensers using paper towel holders or wooden dowels mounted on walls or inside cabinets.
- Use labels and clear containers to organize ribbons by color or type for quick identification.
- Build custom storage with inexpensive wood or cardboard dividers to prevent tangling and crushing.
- Maximize space by utilizing vertical surfaces such as wall-mounted racks or pegboards for efficient ribbon organization.
If you’ve ever struggled to keep your ribbons organized, a DIY ribbon storage solution can save you time and frustration. When you’re surrounded by a jumble of colorful rolls, finding the right one quickly becomes a challenge. That’s where creating your own storage solutions for ribbons makes a significant difference. Not only do you regain control over your craft space, but you also make your ribbon organization more efficient and accessible. The key is designing a system that’s tailored to your space, ribbon types, and personal preferences. You don’t need fancy tools or expensive materials—just a bit of creativity and some basic supplies.
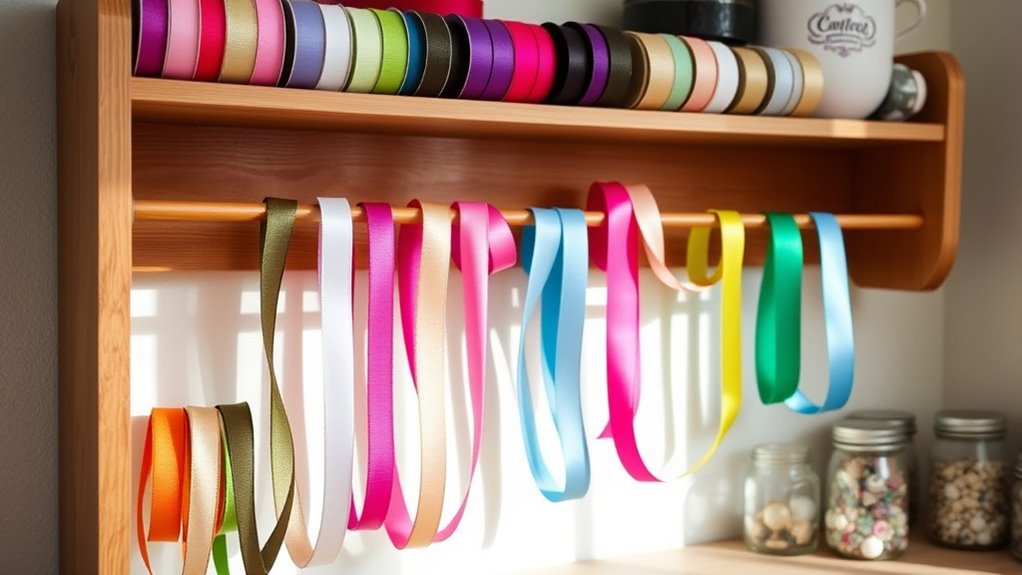
Start by evaluating your current storage situation and identify what’s not working. Do your ribbons get tangled or crushed? Are they difficult to see at a glance? Once you pinpoint the issues, you can plan your DIY storage solutions accordingly. For example, if you want to keep your ribbons visible and easily accessible, consider repurposing items like muffin tins, cookie sheets, or shallow trays. These can hold individual rolls upright, making it easy to see all your options at once. If space is limited, vertical storage can be a game-changer. Using wall-mounted racks, pegboards, or even a tension rod across a closet or craft room wall helps maximize vertical space while keeping your ribbons within reach.
Evaluate your storage, identify issues, and consider repurposing trays or vertical racks for easy ribbon access.
Another effective method is to create a ribbon dispenser using simple materials. You can repurpose a paper towel holder or a wooden dowel mounted on a wall or inside a cabinet door. Wrap your ribbons around the dowel and secure the ends with a clip or a simple knot. This keeps the ribbons from tangling and allows you to pull out just what you need without disturbing the rest. For added organization, label each roll or spool with the type or color of ribbon and store them in clear containers or jars. This not only keeps your ribbons visible but also helps you quickly find the shade or style you’re after.
If you’re seeking a more elaborate solution, consider building a custom shelf or storage box with dividers. Using inexpensive wood or cardboard, you can craft compartments that hold each roll separately. This approach keeps your ribbons neat and prevents crushing or tangling over time. Additionally, understanding different headphone connection types can help you choose the right accessories for your needs, enhancing your overall craft workspace. Whatever DIY method you choose, the goal is to make your ribbon organization as straightforward and efficient as possible. With a little effort upfront, you’ll save time during your craft projects and keep your supplies looking tidy and inviting. A personalized storage solution means your ribbons are always ready to inspire your next creative project.
Frequently Asked Questions
What Materials Are Best for DIY Ribbon Dispensers?
For DIY ribbon dispensers, you should choose materials that are durable and easy to work with, like wood, plastic, or metal. Your materials selection depends on your dispenser design; for example, wood offers a sturdy look, while plastic keeps it lightweight and simple to cut. Consider how you’ll assemble your dispenser and verify the materials can handle regular use, making your project both functional and long-lasting.
How Do I Prevent Ribbon Tangling in Storage?
You can prevent ribbon tangling by organizing your ribbons in decorative containers that keep them separate and accessible. When you’re browsing ribbon shelf ideas, look for solutions that include individual compartments or dowels to hold each ribbon. Using clear, labeled containers helps you find what you need quickly, avoiding unnecessary tugging. Coincidentally, keeping your ribbons tidy not only prevents tangles but also adds a charming touch to your craft space.
Can I Customize Ribbon Storage to Fit Different Ribbon Sizes?
Yes, you can customize your ribbon storage to fit different sizes by using adjustable compartments. Opt for storage containers or racks with customizable dividers, allowing you to modify each section’s size to accommodate various ribbon widths and lengths. This flexibility keeps your ribbons organized and easily accessible. By tailoring the compartments to your needs, you guarantee efficient use of space and prevent tangling or damage, making your storage both practical and versatile.
What Are Cost-Effective Options for Large Ribbon Collections?
You can save money by recycling cardboard for your large ribbon collection—it’s a budget-friendly, eco-friendly option. Using plastic bins also offers a cost-effective solution, as they are durable and available at low prices. Remarkably, over 90% of plastic bins are recyclable, helping you reduce waste. Combining recycled cardboard with plastic bins keeps your ribbons organized without breaking the bank, making your storage both affordable and sustainable.
How Do I Organize Ribbons by Color or Type Efficiently?
To organize your ribbons efficiently by color or type, start by sorting them into clear storage bins. Use color-coded labels on each bin to easily identify different shades or styles. This way, you can quickly find what you need without rummaging through piles. Keep similar ribbons together, and periodically reassess your organization system to make sure it stays practical and easy to maintain.
Conclusion
Now that you’ve created your own ribbon storage and dispenser, you’ve taken a step toward organized crafting. Your space will be more efficient, and your ribbons easily accessible whenever inspiration strikes. Remember, a well-organized workspace is the foundation of creativity—”A place for everything, and everything in its place.” Keep your new setup tidy, and enjoy the beauty of your handiwork every time you craft. Happy creating!