To replace weathered exterior caulk, start by removing the old caulk carefully with a utility knife or caulk remover. Clean the surface thoroughly and let it dry completely. Use a high-quality, weatherproof caulk suitable for your materials, and apply it evenly with a caulking gun. Smooth the bead for a neat seal and allow it to cure fully before exposing it to weather. Continuing will reveal more tips to make certain a long-lasting seal.
Key Takeaways
- Remove all old, cracked, or peeling caulk carefully to ensure a clean surface.
- Clean and dry the area thoroughly before applying new caulk for optimal adhesion.
- Select high-quality, exterior-grade caulk suitable for your surface material (wood, vinyl, brick).
- Apply the caulk in a steady bead, smoothing it with a tool or finger for a neat, effective seal.
- Allow the caulk to cure fully as per manufacturer instructions before exposing it to weather.
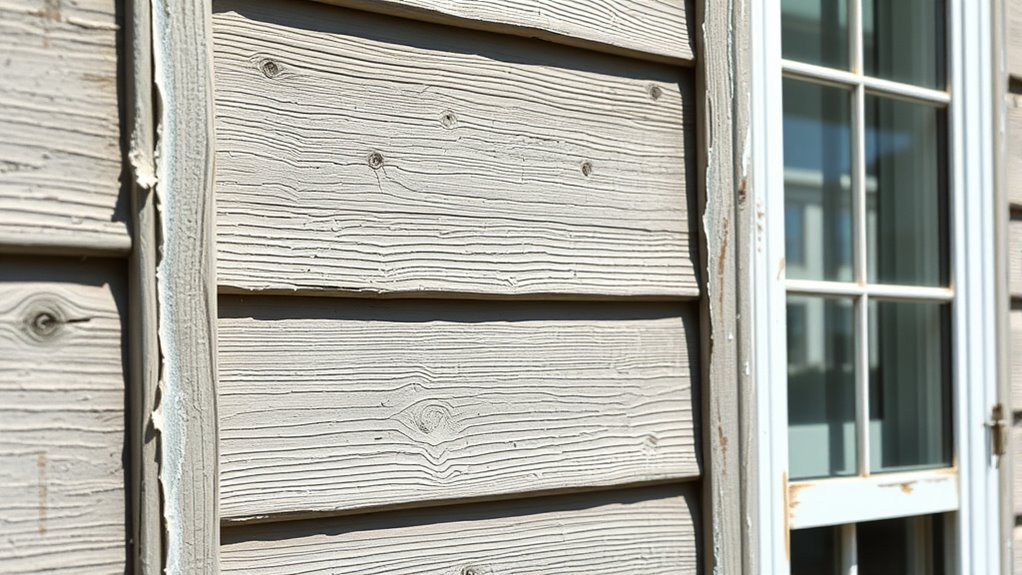
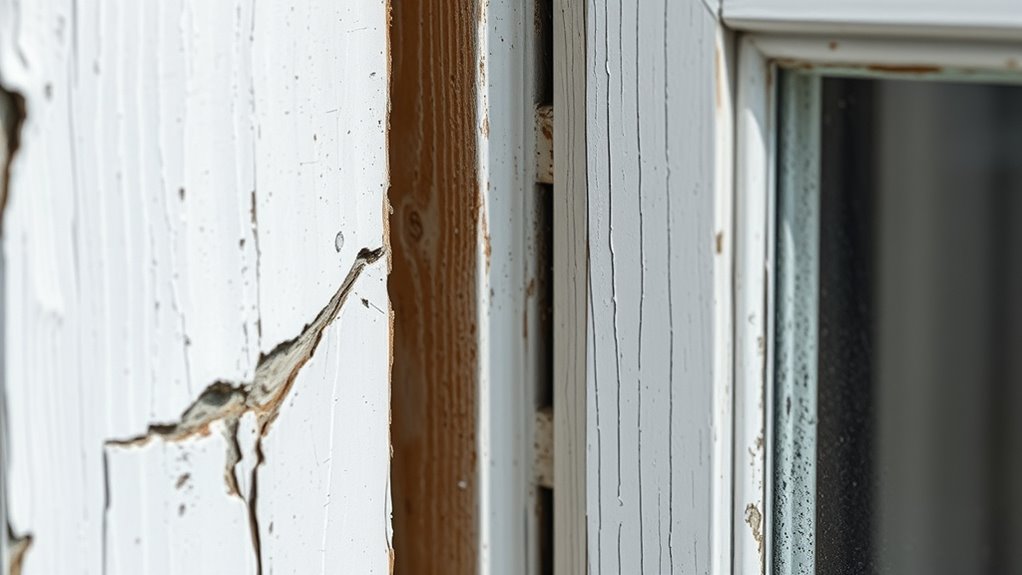
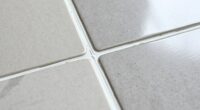
Over time, weathered exterior caulk can crack, peel, or lose its effectiveness, allowing water and drafts to seep in. When this happens, it’s essential to replace the old caulking to maintain your home’s energy efficiency and protect it from moisture damage. The first step is choosing the right caulking materials. You’ll want to select a high-quality, exterior-grade caulk designed for weatherproofing. Silicone-based caulks are flexible and durable, making them ideal for windows and door frames that expand and contract with temperature changes. Polyurethane or acrylic latex caulks are also good options, especially if you prefer a product that’s easy to apply and paintable. Whatever you choose, make sure it’s formulated for exterior use and suited to the specific materials around your home, such as wood, vinyl, or brick.
Replace weathered exterior caulk with durable, weatherproof materials like silicone, polyurethane, or acrylic latex for lasting protection.
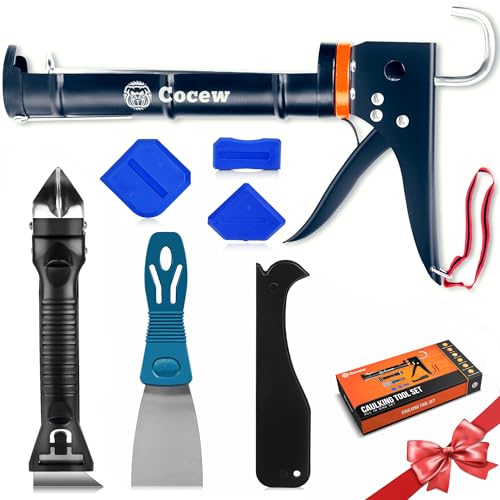
Before applying new caulk, preparation is key. Remove the old, weathered caulk using a utility knife or caulk remover tool. Be careful not to damage the surrounding surfaces. Once you’ve cleared away all the loose material, clean the area thoroughly with a stiff brush and some rubbing alcohol or a mild detergent solution. Removing dirt, dust, and residual caulk ensures the new seal bonds properly. Proper surface prep is crucial for a lasting seal. Allow the area to dry completely before proceeding. Proper surface preparation is vital for weatherproofing techniques to be effective and for the new caulk to adhere securely.
Applying the new caulking involves loading your caulking gun with the selected material and carefully squeezing a steady bead into the gap. Keep a consistent pressure to ensure a smooth, even line. Use a caulk smoothing tool or a moistened finger to sculpt the bead for a professional finish. Focus on sealing all edges and corners thoroughly. During application, work in dry weather and avoid applying caulk in direct sunlight or on frozen surfaces, as these conditions can compromise adhesion. Afterward, give the caulk time to cure as per the manufacturer’s instructions, usually 24 hours, before exposing it to rain or heavy moisture.
Incorporating proper weatherproofing techniques and using suitable caulking materials ensures your home stays protected from the elements. Regularly inspecting and maintaining your exterior seals can extend their lifespan and prevent costly damage. By paying attention to detail during removal and application, you create a more durable, weather-resistant barrier that keeps your home secure and energy-efficient for years to come.

Krud Kutter Caulk Remover Spray, 24 oz, Softens and Removes Caulk, Sealant and Adhesive Residue, Easy to Use Spray for Bathroom, Kitchen, Windows and Tile Surface Prep
Softens Caulk for Easier Removal Helps break down and soften caulk and sealants to make removal easier during…
As an affiliate, we earn on qualifying purchases.
As an affiliate, we earn on qualifying purchases.
Frequently Asked Questions
How Often Should Exterior Caulk Be Inspected and Replaced?
You should inspect your exterior caulk at least once each season to catch any deterioration early. Typically, caulk lasts about 5 to 10 years, depending on material longevity and weather conditions. If you notice cracking, gaps, or peeling during your seasonal inspection, it’s time to replace it. Regular checks help maintain your home’s energy efficiency and prevent water damage, ensuring your exterior stays protected year-round.
Can I Use Indoor Caulk for Exterior Sealing?
Can indoor caulk be used for exterior sealing? Probably not, because indoor vs. outdoor caulk differ in formulation. Indoor caulk isn’t designed to withstand weather, UV rays, or temperature fluctuations. You need exterior caulk for outdoor projects, as it’s formulated for better adhesion and durability in harsh conditions. Using the wrong type can lead to leaks and damage over time. Always select exterior-specific caulk for outdoor sealing to guarantee lasting protection.
What Tools Are Best for Removing Old Caulk?
For caulk removal, you should choose tools like a utility knife, caulk removal tool, or a putty knife. These tools help you efficiently cut and scrape away old caulk without damaging surfaces. Make sure to select a tool with a sharp blade or sturdy edge for easier removal. Using the right tool selection makes the process quicker and guarantees a clean surface for applying new caulk.
Is It Necessary to Wear Protective Gear During Caulk Replacement?
It’s better to be safe than sorry, so yes, you should wear protective gear during caulk replacement. Safety precautions are essential, and protective equipment like gloves, goggles, and a mask help prevent skin irritation and inhaling fumes. Even if the task seems simple, don’t take shortcuts with safety. Your health is worth the extra effort, and wearing proper gear guarantees you avoid unnecessary risks while working with caulk.
How Long Does New Exterior Caulk Typically Last?
New exterior caulk typically lasts between 5 to 10 years, depending on caulk durability and weather effects. Harsh weather conditions like rain, sun, and temperature fluctuations can shorten its lifespan, so you should regularly inspect and maintain it. Proper application and choosing the right caulk for your climate guarantee longer-lasting results. Keep an eye on any cracks or gaps to prevent water damage and maintain your home’s exterior integrity.

GE All Purpose Silicone Caulk, Clear, 10 fl oz Cartridge, 1 Pack – 100% Waterproof Silicone Sealant, Stronger Adhesion, Freeze & Sun Proof
100% Waterproof and Weatherproof: This 100% silicone formula offers protection from water damage, providing a reliable seal in…
As an affiliate, we earn on qualifying purchases.
As an affiliate, we earn on qualifying purchases.
Conclusion
Replacing weathered exterior caulk keeps your home protected and looking fresh. Did you know that properly sealed exteriors can reduce energy costs by up to 15%? Taking the time to maintain your caulk not only prevents water damage but also saves you money in the long run. So, don’t overlook this simple task—your home’s durability and your wallet will thank you for it. Stay proactive, and your house will stay cozy and secure for years to come.
Caulk Gun Kit, Smooth Silicone Caulking Gun and Caulk Remover Tool, Sealant Finishing Tool Grout Scraper for Kitchen Bathroom Window Sink Joint, All in One with Gift Box
【Easy to operate】Cocew Caulking Gun is lightweight, the Smooth Pressure Rod is available with a high thrust ratio….
As an affiliate, we earn on qualifying purchases.
As an affiliate, we earn on qualifying purchases.
GE All Purpose Silicone Caulk, Clear, 10 fl oz Cartridge, 1 Pack – 100% Waterproof Silicone Sealant, Stronger Adhesion, Freeze & Sun Proof
100% Waterproof and Weatherproof: This 100% silicone formula offers protection from water damage, providing a reliable seal in…
As an affiliate, we earn on qualifying purchases.
As an affiliate, we earn on qualifying purchases.