To create a geometric wall mural using painter’s tape, start by planning your design and gathering all necessary supplies like tape, measuring tools, and paints. Prepare your wall by cleaning and smoothing the surface before carefully taping out your shapes, ensuring sharp, clean edges. Once taped, paint within the lines, applying multiple coats if needed. After the paint dries, carefully remove the tape and touch up any imperfections. Continuing will guide you through each detailed step for a stunning, professional finish.
Key Takeaways
- Plan your geometric pattern carefully with sketches or digital layouts before taping.
- Use painter’s tape to create sharp, clean edges by pressing firmly along all shape boundaries.
- Measure and mark wall sections accurately to ensure proportional and symmetrical shapes.
- Apply paint in controlled, steady strokes, and remove tape at a 45-degree angle for crisp lines.
- Seal the finished mural with a clear protective coating to preserve colors and prevent damage.
Gathering Supplies and Planning Your Design
Before you start creating your geometric wall mural, it’s important to gather all the necessary supplies and plan your design carefully. Begin by selecting a color palette that complements your space and sets the mood you want. Consider your design inspiration—whether it’s modern minimalism, bold patterns, or intricate shapes—to guide your choices. Make a rough sketch or use digital tools to visualize the layout and determine the placement of each geometric shape. Gather painter’s tape, measuring tools, a level, and your chosen paints or markers. Planning ahead helps you avoid mistakes and guarantees a cohesive look. Additionally, understanding color accuracy can help ensure your mural’s hues are true to your vision. With your supplies ready and your design idea clear, you’ll set yourself up for a smooth and successful mural creation process.
Preparing the Wall Surface for Painting
Before you start painting, make sure to clean the wall thoroughly with a mild detergent to remove dust and grease. Proper tape application is key—press down firmly and use painter’s tape for clean edges. These steps guarantee your geometric mural will look sharp and professional. Additionally, choosing the right wall surface can significantly impact the final appearance of your mural.
Surface Cleaning Techniques
Ensuring the wall surface is clean is essential for a smooth and durable mural. Start by removing dust and loose debris through thorough dust removal with a soft cloth or vacuum. For stubborn stains or grease, use appropriate cleaning solvents like mild detergent or specialized wall cleaners. Always test solvents on a small area first. Here’s a quick guide:
| Surface Type | Recommended Cleaning Method |
|---|---|
| Dusty walls | Dust removal with a soft cloth or vacuum |
| Greasy spots | Cleaning solvents like mild detergent or wall cleaner |
| Stains | Spot clean with appropriate cleaning solutions |
| Mold or mildew | Use a mixture of water and mild bleach solution |
| Cracks or holes | Repair before cleaning to ensure smooth surface |
Proper cleaning prepares your wall for precise tape application and long-lasting results. Additionally, ensuring the surface is free of contaminants can improve paint adhesion and overall mural quality.
Tape Application Tips
To achieve clean, sharp paint lines, you need to apply painter’s tape carefully and correctly. Start by choosing the right tape type—some tapes are designed for delicate surfaces, while others adhere better to textured walls. When selecting colors for your mural, consider how contrasting or complementary they are; this affects tape placement and edge sharpness. Before applying, verify the wall surface is smooth, clean, and dry to prevent paint bleeding. Press down the tape firmly along the edges, especially in corners and curves, to create a tight seal. Use painter’s tape that matches your project’s needs to avoid bleeding and ensure crisp lines. Proper tape application sets the foundation for a professional-looking geometric mural. Additionally, understanding paint adhesion techniques can help ensure your design remains crisp and durable over time.
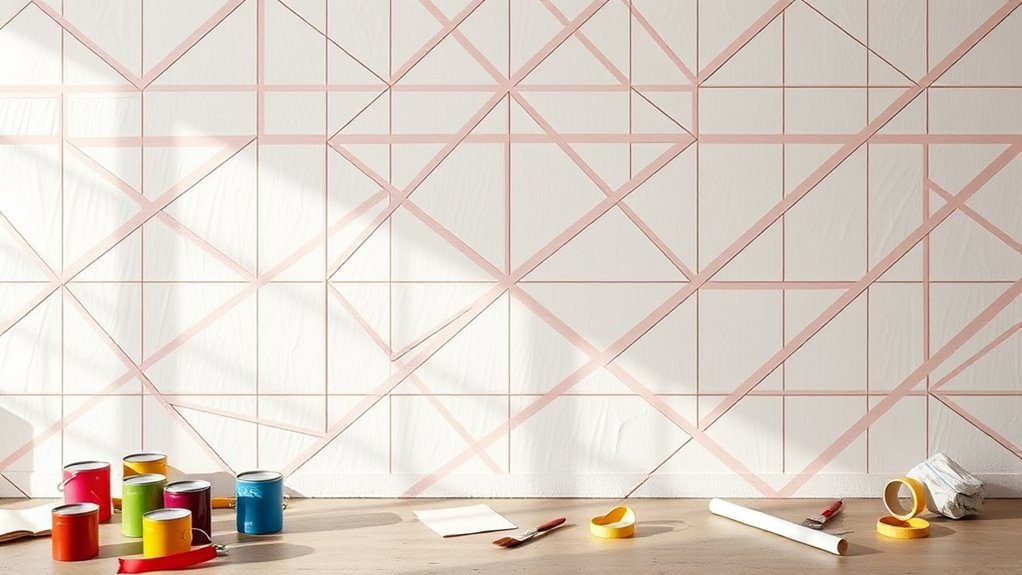
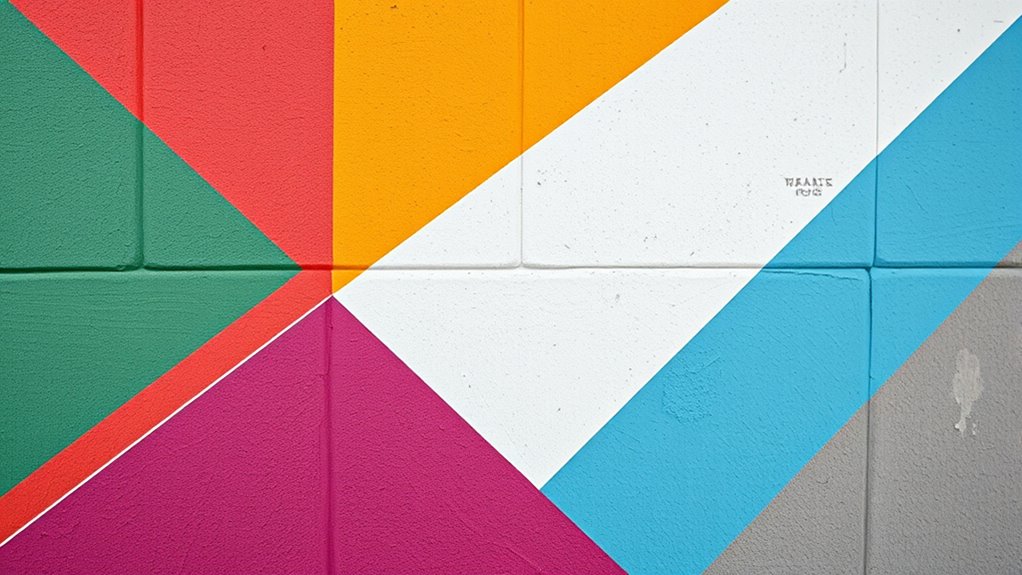
Creating Your Geometric Pattern With Painter’S Tape
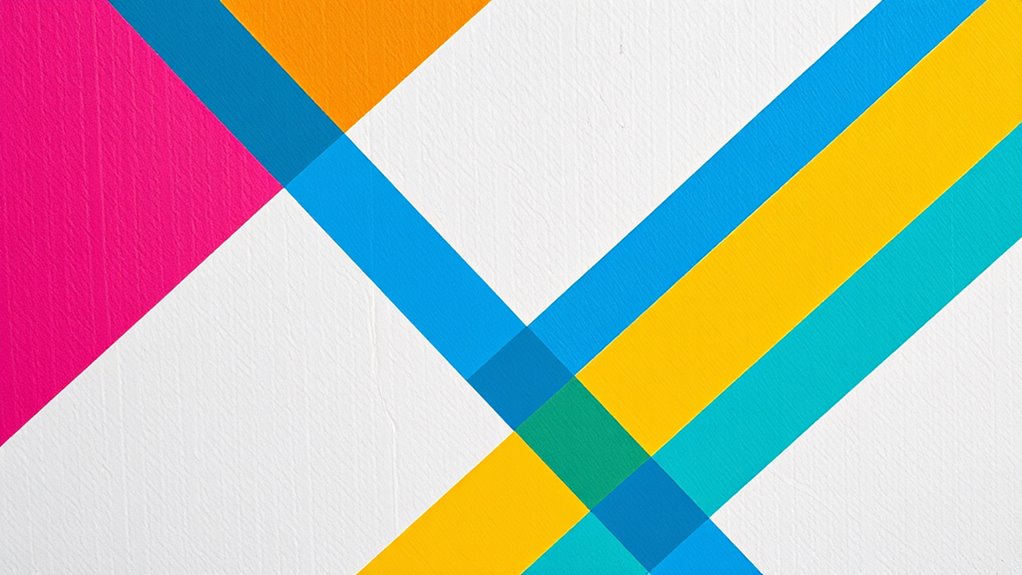
Start by planning your design carefully, considering how the shapes will fit together on your wall. Then, cut the painter’s tape into the shapes you need and apply it precisely along your pencil lines. Taking your time with these steps guarantees clean, sharp edges for your geometric mural. Incorporating precise application techniques can further improve your results and ensure a professional-looking finish.
Planning Your Design
Before you begin applying painter’s tape, it’s essential to plan your geometric pattern carefully. Start by deciding on your color schemes, choosing hues that complement or contrast your wall color for a striking effect. Consider the pattern complexity—simple shapes like triangles or squares work well for beginners, while intricate designs add visual interest if you’re more experienced. Sketch your pattern on paper or use digital tools to visualize how the shapes will fit together. Measure your wall carefully to ensure proportionality and symmetry. Decide where to start and how to build your design outward. Clear planning minimizes mistakes and helps you stay organized, ensuring your mural turns out exactly as you envision it. Incorporating space and organization strategies can also help you maintain a clutter-free workspace during your project.
Cutting and Applying Tape
Once you’ve planned your design, it’s time to cut and apply painter’s tape to create your geometric pattern. Carefully measure and cut the tape into straight lines or shapes that match your design. As you apply the tape, press down firmly along the edges to prevent paint bleed. Be precise to ensure clean, sharp lines. When you finish taping, step back and review your pattern for any needed design adjustments. If you notice areas where tape isn’t adhering well, press them down again. During tape removal, do so slowly and at a 45-degree angle to avoid damaging your fresh paint. Taking your time guarantees crisp edges and a professional look, making your geometric wall mural truly stand out. Paying attention to vibrational energy during your project can also enhance your creative flow and overall satisfaction with the finished piece.
Painting the Design and Ensuring Crisp Lines

To achieve sharp, clean lines on your geometric wall mural, it is vital to work carefully and methodically as you paint. Use precise brush techniques, applying steady, controlled strokes along the edges of the tape to prevent paint from bleeding underneath. For areas requiring multiple colors, focus on color blending by working quickly before the paint dries, creating smooth transitions where needed. Keep your brushes clean and use minimal paint to avoid drips or uneven lines. Take your time, especially at corners and intersections, to maintain crisp edges. If a line isn’t as sharp as you’d like, wait for the paint to dry completely before touching up with a fine brush. This careful approach guarantees your mural looks professional and visually striking. Be mindful of paint bleeding and use quality painter’s tape designed for clean lines to ensure the best results.
Removing Tape and Touching Up Details
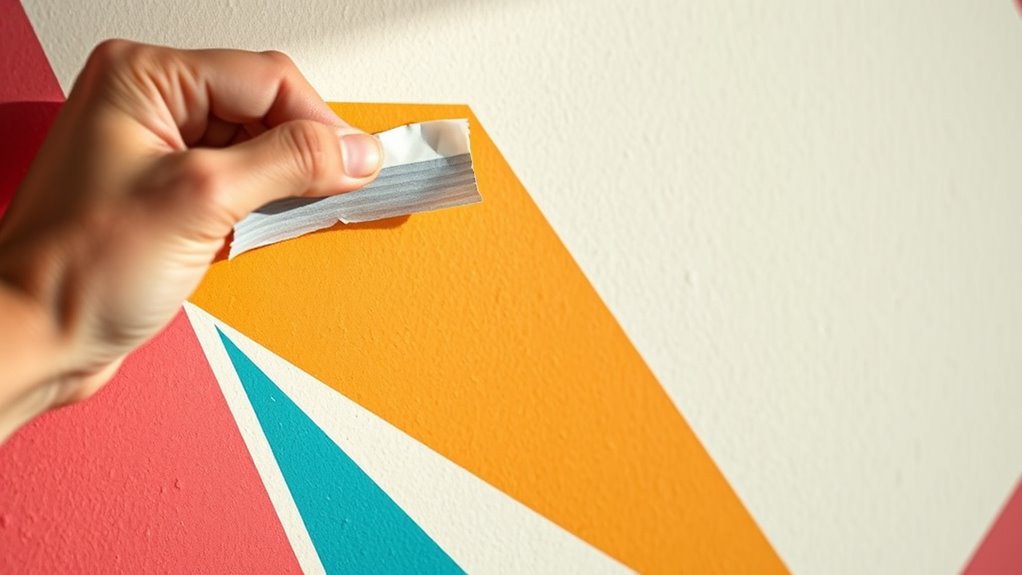
Carefully remove the painter’s tape once the paint has fully dried to preserve your sharp lines and clean edges. As you peel away the tape, do so slowly to prevent any paint from lifting or smudging. This is also the perfect time to check your color blending; if you notice any uneven edges, use a fine brush to touch up those areas. When removing the tape, work at a 45-degree angle for smooth tape removal and crisp lines. Keep these tips in mind:
- Patience during tape removal ensures clean results
- Touch up small imperfections immediately
- Use steady, gentle strokes for seamless blending
- Avoid rushing to maintain sharp geometric shapes
Also, be mindful of the exfoliation process to keep your painted surface smooth and free of debris that could interfere with the final look. This approach guarantees your mural’s details stay precise and vibrant, enhancing the overall geometric effect.
Final Tips for Maintaining Your Mural’s Fresh Look

Maintaining your mural’s vibrant appearance requires consistent care and attention. Sealing finishes protect the paint from moisture and fading, so make sure to apply a quality sealant after completing your project. Regular touch ups help keep lines sharp and colors fresh, especially in high-traffic areas. Additionally, understanding health implications, such as avoiding exposure to moisture and UV rays, can help preserve your mural’s quality over time.
Here’s a quick guide:
| Tip | Explanation |
|---|---|
| Seal with Finishes | Use a clear sealant to lock in colors and prevent damage. |
| Schedule Touch-Ups | Touch up any chips or fading spots promptly. |
Frequently Asked Questions
How Long Does a Geometric Wall Mural Typically Last?
A geometric wall mural usually lasts several years, depending on durability factors like paint quality and wall surface. Proper maintenance tips, such as cleaning with gentle solutions and avoiding harsh scrubbing, can extend its lifespan. Keep in mind that exposure to sunlight and humidity might cause fading or peeling over time. By taking care of your mural and choosing durable materials, you can enjoy its vibrant look for many years.
Can Painter’S Tape Be Reused for Multiple Projects?
Painter’s tape can sometimes be reused, but its durability and reuse potential depend on how well you remove it and how much adhesive remains. If you carefully peel it off without stretching or tearing, you might reuse it for small projects. However, for best results and clean lines, it’s often better to use fresh tape, as over time, tape’s adhesive weakens and its effectiveness diminishes.
What Are the Best Wall Colors to Complement a Geometric Mural?
Imagine transforming your space with the perfect wall colors that make your mural pop. You’ll want to choose complementary color schemes that enhance your design, maybe soft neutrals or bold contrasts. Accent colors can add depth and interest, drawing attention to specific areas. When selecting, consider your existing decor and mood you want to create. The right combination will elevate your mural, making it a stunning focal point that captivates everyone who enters.
How Do I Fix Mistakes Made With Painter’S Tape?
When fixing mistakes made with painter’s tape, start with mistake correction by carefully evaluating the area. Gently peel back the tape at a 45-degree angle to minimize paint lifting. If paint has bled, use a small brush or touch-up pen for correction. For tape removal, do it slowly and steadily, and if needed, use a bit of warm water or a mild solvent to help with tape removal without damaging your wall.
Is It Possible to Remove the Mural Without Damaging the Paint?
Removing your mural is like peeling a delicate sticker off a surface—you want to do it gently. You can carefully use heat from a hairdryer to soften the paint, making paint removal easier without damaging the wall. If needed, apply a gentle wall repair compound to fix any minor scratches or marks. Just take your time, and you’ll preserve your wall’s integrity while safely removing the mural.
Conclusion
Once you’ve completed your geometric wall mural, your space will shine like a diamond in the rough. Remember, patience and careful tape work are your best friends in achieving crisp, clean lines. With your creative vision brought to life, your wall becomes a canvas of your personality. Keep it looking fresh by occasional touch-ups and gentle cleaning. Your mural isn’t just a decoration – it’s a reflection of your artistic spirit, ready to inspire everyone who enters.